My prediction came true! As I shared previously about painting my daughter’s Dance Costume, the season turned out to be incredibly rewarding. She even received a costume award – which she jokingly claims is hers alone.
However, more significant than any placement, she experienced personal growth, developed as a dancer, and genuinely enjoyed herself. Because, in the end, trophies and medals are secondary to the joy and progress found in the journey.
Before the competition season began, I initially wrote about painting her solo costume. Now, after witnessing it grace the stage nearly ten times, I’m revisiting the lessons I learned throughout the process of painting on a dance costume. (You can find the initial set of lessons here.)
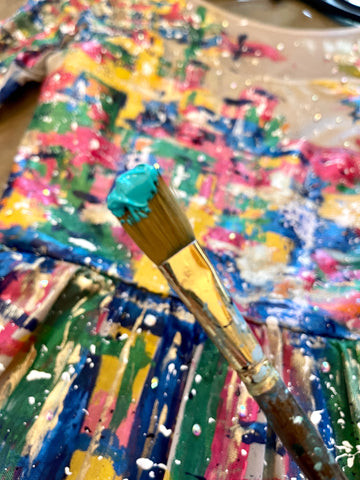
Acrylic Paints: Your Best Bet for Layered Designs
The choreographer envisioned the costume resembling one of my canvas paintings. Therefore, using the same acrylic paints I use on canvas was a natural choice. I favor brands like Liquitex and Master’s Touch and incorporated this metallic acrylic paint from Michael’s for added shimmer.
While I experimented with fabric spray paint and liquid fabric paint, I found they tended to saturate the costume fabric and didn’t lend themselves well to layering. Oil paints were not an option for me due to concerns about toxicity and their extended drying time.
I opted to leave the paint unsealed, a decision I’d repeat. Although there was minor peeling in a couple of areas, it was minimal and didn’t require repair. For more extensive wear, reinforcing these spots with fabric glue would be a wise precaution.
 Close-up of acrylic paint layers on a dance costume, showcasing texture and depth.
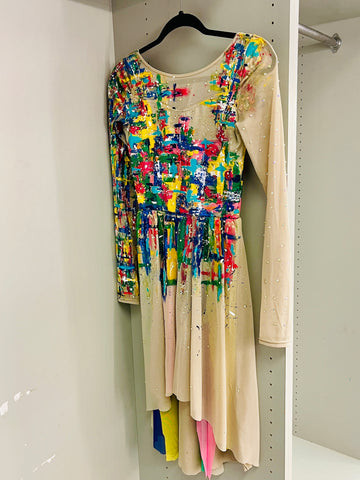
Consider Every Angle of the Dance Costume
I’m so glad I didn’t neglect the back of the costume. Dancers move dynamically across the stage, and every angle is visible to the audience and judges. Therefore, a complete design ensures visual appeal from all perspectives.
That being said, I regret not extending the paint design fully onto the mesh sleeves. I decided against painting the underside where the sleeve connected to the bodice, thinking it might experience too much friction. However, seeing photos and videos, the unpainted space is noticeable, and I wish I had continued the design seamlessly in that area.
 Dance costume painted on all angles, highlighting the design on the back and side for stage visibility.
Bling Elevates Any Dance Costume
With a tight deadline before her first performance, finishing the costume became a matter of “done is better than perfect.” After the initial competition, I had time to carefully review videos and enhance the costume further.
Adding pops of bright viridian color and strategically placed rhinestones made a significant difference. The choreographer had already applied some rhinestones, so I concentrated on embellishing the unpainted “white space” to create a more cohesive and dazzling look.
For attaching rhinestones and other embellishments, I rely on E600 Fabri-Fuse Glue and a simple tool: the end of a pen dipped in candle wax. (Yes, it’s a bit unconventional!) While specialized rhinestone applicator tools exist, my homemade method has worked perfectly since last year, and I haven’t looked back.
 Rhinestones and viridian color accents added to a painted dance costume for enhanced visual appeal.
Painting on Mesh Demands Patience
If I ever undertake painting on mesh again, I’ll definitely start with a very light coat of fabric spray paint. I believe this initial base layer could stabilize the fabric, minimizing movement when applying acrylic paint on top.
A cardboard shirt form proved invaluable for stretching the costume bodice taut. However, cardboard stuck to the paint beneath the mesh sleeves, trim, and skirt. For future projects, I recommend using silicone or rigid plastic forms that won’t cause damage upon removal and offer a smoother surface.
 Close view of painted mesh on a dance costume, illustrating the challenge of painting on flexible fabric.
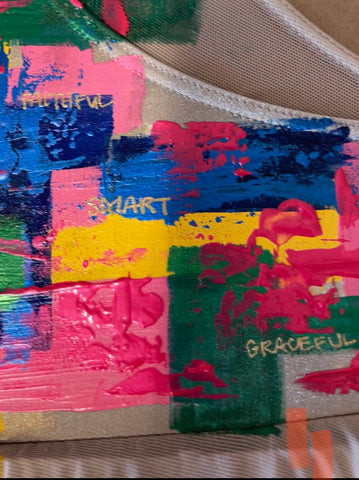
Personal Touches Deepen the Dancer-Costume Connection
Every painting I create begins with a prayer and meaningful words written onto the canvas. My daughter’s costume was no exception.
Creating a unique dance costume for a truly special dancer was deeply personal for both of us. To make it completely hers, I incorporated words of prayer and descriptors of her character into the design.
After establishing a base layer of paint, I used an oil-based paint pen to inscribe words of prayer for my daughter on the front of the costume. These were then covered with more paint, intended to remain a private message. On the back, I visibly wrote words characterizing her personality. My intention was for her to see these affirming words and remember her unique and wonderful qualities every time she wore the costume.
 Personalized dance costume with hidden words of prayer painted inside for a meaningful touch.
 Dance costume back with visible words describing the dancer's character, adding a personal message.
Final Reflections
Words can hardly express the profound joy of watching my daughter pour her heart into a performance while wearing a costume into which I had poured my own. I am eternally grateful for the opportunity to have created this special piece for her.