
Building your own dance floor is an achievable and rewarding project. At ten-dance.com, we’ll guide you through the process with easy-to-follow steps. This guide will provide you with detailed instructions, cost-effective solutions, and creative ideas to construct a fantastic dance space, perfect for any occasion. Get ready to put on your dancing shoes and create a personalized dance haven!
1. What Are the Benefits of Building Your Own Dance Floor?
Building your own dance floor offers several compelling advantages. It’s more affordable than renting, allows customization, and provides a dedicated space for dance practice, parties, or events.
1.1 Cost Savings
Constructing a dance floor yourself can lead to significant savings. Rental costs for dance floors can range from $700 to $800 for a single event. Building your own eliminates these recurring expenses. According to financial analyses, a DIY dance floor can cost as little as $300, offering long-term value.
1.2 Customization Options
DIY dance floors can be tailored to your specific needs and aesthetic preferences. You choose the size, shape, materials, and finish, ensuring the dance floor perfectly complements your space and style.
1.3 Convenience and Accessibility
Having a permanent dance floor at home or in your studio offers unmatched convenience. You can practice, host dance parties, or organize events anytime without the hassle of renting and setting up a temporary floor.
1.4 Increased Property Value
A well-constructed dance floor can add value to your property. It enhances recreational space and appeal, making your home or studio more attractive to potential buyers.
1.5 Personal Satisfaction
The process of building a dance floor is a rewarding experience. The sense of accomplishment and pride in creating something functional and beautiful is invaluable.
2. What Are the Essential Considerations Before You Start?
Before embarking on your dance floor project, several crucial factors need careful consideration. These include the intended use, available space, budget, and the type of flooring material best suited to your needs.
2.1 Intended Use
The primary use of the dance floor will significantly influence your design and material choices. Will it be used for ballet, tap, ballroom, or general social dancing? Different dance styles require varying levels of cushioning, slip resistance, and durability.
2.2 Space Assessment
Evaluate the dimensions of the space where the dance floor will be located. Measure the area accurately to determine the optimal size and shape of your floor. Consider the layout of the room and any potential obstructions, such as pillars or furniture.
2.3 Budget Planning
Establish a realistic budget for your project. Research the cost of materials, tools, and any professional assistance you may require. Be prepared to adjust your design or material choices to stay within your financial constraints.
2.4 Flooring Material Selection
Choose a flooring material that meets your specific needs and preferences. Popular options include hardwood, plywood, vinyl, and specialized dance floor surfaces. Each material offers unique advantages and disadvantages regarding cost, durability, maintenance, and suitability for different dance styles.
2.5 Subfloor Preparation
Ensure the subfloor is level, clean, and structurally sound. A stable subfloor is essential for the longevity and performance of your dance floor. Repair any cracks, holes, or uneven surfaces before proceeding with the installation.
3. What Tools and Materials Do You Need to Build a Dance Floor?
Gathering the right tools and materials is crucial for a successful dance floor construction project. Here’s a comprehensive list to help you get started.
3.1 Essential Tools
- Measuring Tape: For accurate measurements of the space and materials.
- Circular Saw: For cutting plywood and lumber to size.
- Jigsaw: For making curved or intricate cuts.
- Drill/Driver: For screwing together the frame and attaching the flooring.
- Sander: For smoothing rough edges and preparing surfaces for finishing.
- Hammer: For driving nails (if preferred over screws).
- Level: For ensuring the floor is even and stable.
- Safety Glasses: For protecting your eyes from debris.
- Dust Mask: For preventing inhalation of dust particles.
3.2 Materials
- Plywood: For the surface of the dance floor. 1/2″ or 3/4″ thickness is recommended.
- 2×4 Lumber: For constructing the frame.
- Screws/Nails: For assembling the frame and attaching the plywood.
- Wood Glue: For strengthening joints.
- Floor Paint/Finish: For sealing and protecting the surface.
- Painter’s Tape: For creating clean lines when painting.
- Mending Plates: For joining sections of the dance floor together (optional).
- Foam Underlayment: For cushioning and sound absorption (optional).
3.3 Additional Supplies
- Sandpaper: For smoothing surfaces.
- Paintbrushes/Rollers: For applying paint or finish.
- Rags: For cleaning and wiping surfaces.
- Pencils: For marking measurements.
- Clamps: For holding pieces together while gluing and screwing.
4. How Do You Design Your Dance Floor?
Designing your dance floor involves determining the size, shape, and layout of the floor, as well as selecting the right materials and finish to meet your specific needs.
4.1 Determine the Size and Shape
Consider the available space and the number of dancers who will use the floor simultaneously. A general guideline is to allow at least 6 square feet per dancer. Common shapes include square, rectangle, and circular.
4.2 Choose the Right Materials
Select materials that are durable, comfortable, and appropriate for the intended dance style. Hardwood is a classic choice for its elegant appearance and smooth surface. Plywood offers a more affordable alternative, while vinyl provides excellent slip resistance and cushioning.
4.3 Plan the Layout
Decide whether you want a permanent or portable dance floor. Permanent floors are typically installed directly onto the subfloor, while portable floors consist of modular sections that can be easily assembled and disassembled.
4.4 Select the Finish
Choose a finish that protects the surface from wear and tear while providing the desired level of slip resistance. Polyurethane is a popular choice for its durability and ease of maintenance.
4.5 Consider Additional Features
Think about incorporating additional features such as LED lighting, mirrors, or soundproofing to enhance the dance experience.
5. Step-by-Step Guide to Building Your Dance Floor
Follow these detailed steps to construct your own dance floor, ensuring a stable, safe, and enjoyable dancing surface.
5.1 Prepare the Subfloor
- Clean the Area: Remove any debris, dust, or dirt from the subfloor.
- Level the Surface: Ensure the subfloor is level. Use a self-leveling compound to fill in any low spots.
- Repair Damage: Fix any cracks, holes, or uneven surfaces.
- Install Underlayment (Optional): Add a layer of foam underlayment for cushioning and sound absorption.
5.2 Build the Frame
- Cut the Lumber: Cut the 2×4 lumber to the desired dimensions of your dance floor.
- Assemble the Frame: Use screws and wood glue to assemble the frame. Ensure the corners are square.
- Add Support Beams: Install support beams every 16 inches to provide additional stability.
5.3 Attach the Plywood
- Cut the Plywood: Cut the plywood sheets to fit the frame.
- Attach the Plywood: Use screws to attach the plywood to the frame. Space the screws every 6-8 inches.
- Sand the Surface: Smooth any rough edges or uneven surfaces with a sander.
 Dance Floor Construction
5.4 Finish the Floor
- Prime the Surface: Apply a primer to the plywood to prepare it for painting or finishing.
- Paint or Finish: Apply the desired paint or finish to the surface. Follow the manufacturer’s instructions for application and drying time.
- Add Protective Coating: Apply a clear protective coating to enhance durability and prevent scratches.
5.5 Assemble the Sections (If Portable)
- Attach Mending Plates: Use mending plates to join the sections of the dance floor together.
- Test the Floor: Ensure the sections are securely connected and the floor is stable.
6. How Do You Paint and Finish Your Dance Floor?
Painting and finishing your dance floor not only enhances its appearance but also protects it from wear and tear.
6.1 Preparation
- Sand the Surface: Use a sander to smooth any rough edges or imperfections.
- Clean the Surface: Remove any dust or debris with a damp cloth.
- Apply Primer: Apply a primer to the surface to ensure the paint adheres properly.
6.2 Painting
- Choose Paint: Select a high-quality floor paint that is durable and slip-resistant.
- Apply First Coat: Apply the first coat of paint evenly using a brush or roller.
- Allow to Dry: Let the paint dry completely according to the manufacturer’s instructions.
- Apply Second Coat: Apply a second coat of paint for added durability and coverage.
6.3 Finishing
- Select Finish: Choose a clear polyurethane finish to protect the painted surface.
- Apply Finish: Apply the finish evenly using a brush or roller.
- Allow to Dry: Let the finish dry completely according to the manufacturer’s instructions.
- Apply Additional Coats: Apply additional coats of finish for added protection and shine.
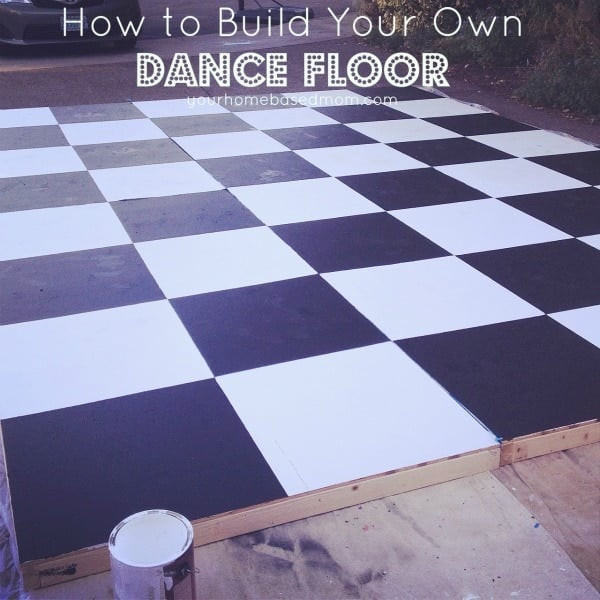
6.4 Checkerboard Pattern
- Tape Off Squares: Use painter’s tape to create a checkerboard pattern with 24″ x 24″ squares.
- Paint Squares: Apply black paint to the taped-off squares using a foam roller.
- Remove Tape: Carefully remove the tape after the paint has dried.
Dance Floor Construction
7. What Are the Different Types of Dance Floors You Can Build?
There are several types of dance floors you can build, each suited to different dance styles and preferences.
7.1 Sprung Floor
- Description: A sprung floor is designed with a degree of flexibility to absorb impact and reduce the risk of injury.
- Construction: It typically consists of a subfloor with foam or rubber pads, topped with a hardwood or plywood surface.
- Best For: Ballet, contemporary, and other high-impact dance styles.
7.2 Marley Floor
- Description: A Marley floor is a non-slip vinyl surface that provides excellent traction and cushioning.
- Construction: It is typically installed over a sprung floor or a smooth, level subfloor.
- Best For: Ballet, jazz, modern, and theatrical dance.
7.3 Hardwood Floor
- Description: A hardwood floor offers a classic and elegant appearance with a smooth, durable surface.
- Construction: It is typically installed directly onto the subfloor.
- Best For: Ballroom, tap, and social dancing.
7.4 Plywood Floor
- Description: A plywood floor provides an affordable and versatile option for various dance styles.
- Construction: It is typically installed over a frame or directly onto the subfloor.
- Best For: General dance practice, parties, and events.
7.5 Portable Floor
- Description: A portable floor consists of modular sections that can be easily assembled and disassembled.
- Construction: The sections are typically made of plywood or vinyl and connected with interlocking edges or mending plates.
- Best For: Temporary events, home practice, and travel.
8. How Do You Maintain and Care for Your Dance Floor?
Proper maintenance and care are essential to prolong the life and performance of your dance floor.
8.1 Regular Cleaning
- Sweep Regularly: Sweep the floor daily to remove dust, dirt, and debris.
- Mop Occasionally: Mop the floor weekly with a damp cloth and a mild detergent.
- Avoid Harsh Cleaners: Do not use abrasive cleaners, solvents, or bleach, as they can damage the surface.
8.2 Protect the Surface
- Use Floor Protectors: Place floor protectors under furniture legs to prevent scratches and dents.
- Avoid Sharp Objects: Do not wear shoes with sharp heels or bring sharp objects onto the dance floor.
- Use Mats: Place mats at entrances to prevent dirt and debris from being tracked onto the floor.
8.3 Inspect Regularly
- Check for Damage: Inspect the floor regularly for scratches, dents, or loose sections.
- Repair Promptly: Repair any damage promptly to prevent further deterioration.
8.4 Refinish as Needed
- Sand the Surface: Sand the surface to remove scratches and imperfections.
- Apply New Finish: Apply a new coat of finish to protect the surface and restore its shine.
9. What Are the Common Mistakes to Avoid When Building a Dance Floor?
Avoid these common pitfalls to ensure your dance floor project is a success.
9.1 Not Leveling the Subfloor
- Mistake: Failing to ensure the subfloor is level can result in an uneven and unstable dance floor.
- Solution: Use a self-leveling compound to fill in any low spots and create a smooth, even surface.
9.2 Using Inadequate Materials
- Mistake: Using low-quality or inappropriate materials can compromise the durability and performance of the dance floor.
- Solution: Choose high-quality materials that are specifically designed for dance floors.
9.3 Poor Frame Construction
- Mistake: A poorly constructed frame can lead to instability and sagging.
- Solution: Use screws and wood glue to assemble the frame and install support beams every 16 inches.
9.4 Improper Finishing
- Mistake: Improper finishing can result in a slippery or sticky surface.
- Solution: Use a high-quality floor paint or finish that is slip-resistant and apply it according to the manufacturer’s instructions.
9.5 Neglecting Maintenance
- Mistake: Neglecting regular maintenance can shorten the lifespan of the dance floor.
- Solution: Sweep regularly, mop occasionally, and inspect the floor for damage.
10. How Much Does It Cost to Build a Dance Floor?
The cost of building a dance floor can vary depending on the size, materials, and complexity of the project.
10.1 Material Costs
- Plywood: $30-$60 per sheet
- 2×4 Lumber: $5-$10 per piece
- Screws/Nails: $10-$20 per box
- Wood Glue: $5-$10 per bottle
- Floor Paint/Finish: $20-$50 per gallon
- Underlayment: $0.50-$1.00 per square foot
10.2 Labor Costs
- DIY: Free (if you do it yourself)
- Professional Installation: $5-$10 per square foot
10.3 Sample Budget
For a 12×16 foot dance floor:
- Materials: $300-$600
- Labor: $0 (DIY) or $960-$1920 (Professional)
- Total: $300-$600 (DIY) or $1260-$2520 (Professional)
10.4 Cost-Saving Tips
- Shop Around: Compare prices from different suppliers.
- Use Recycled Materials: Consider using recycled lumber or plywood.
- Do It Yourself: Save on labor costs by building the dance floor yourself.
Building your own dance floor is a rewarding project that can provide you with a dedicated space for dance practice, parties, or events. By following these steps and tips, you can create a beautiful and functional dance floor that meets your specific needs and preferences.
Unlock your dance potential with ten-dance.com! Explore a diverse range of online dance lessons tailored to all skill levels and styles. Discover local dance classes and events happening near you, and connect with a vibrant community of fellow dance enthusiasts. Visit ten-dance.com today and start your dance journey.
FAQ: Building Your Own Dance Floor
1. What is the best material for a dance floor?
The best material depends on the intended use. Hardwood is excellent for ballroom, Marley for ballet and modern, and plywood is a cost-effective option for general use.
2. How do I make a dance floor slip-resistant?
Use a floor paint or finish that is specifically designed to be slip-resistant. You can also add a non-slip coating or use a Marley floor.
3. Can I build a dance floor on carpet?
It’s not recommended. Carpet can create an uneven surface. Remove the carpet and ensure the subfloor is level before building your dance floor.
4. How do I make a portable dance floor?
Build modular sections using plywood and a frame. Connect the sections with mending plates or interlocking edges for easy assembly and disassembly.
5. How do I soundproof my dance floor?
Install a layer of foam underlayment beneath the floor to absorb sound and reduce vibrations.
6. What tools do I need to build a dance floor?
Essential tools include a measuring tape, circular saw, drill/driver, sander, hammer, level, safety glasses, and a dust mask.
7. How much does it cost to build a dance floor?
DIY dance floors can cost as little as $300, depending on materials. Professional installation can range from $1260-$2520 for a 12×16 foot floor.
8. How do I clean my dance floor?
Sweep regularly and mop occasionally with a damp cloth and mild detergent. Avoid harsh chemicals that can damage the surface.
9. How do I repair a damaged dance floor?
Repair scratches by sanding and refinishing the surface. Replace damaged sections as needed.
10. Where can I find dance lessons and events?
Visit ten-dance.com to explore online dance lessons, discover local dance classes, and connect with the dance community. Our address is 60 Lincoln Center Plaza, New York, NY 10023, United States and our phone number is +1 (212) 769-7000.