Representing dance steps clearly and effectively is crucial for choreography, teaching, and documentation. While words can describe movements, visual aids offer an immediate and intuitive understanding. This guide explores how to leverage the power of LaTeX and the TikZ package to create precise and visually appealing diagrams of dance steps, specifically focusing on Drawing Dance footwork. Whether you’re a choreographer, a dance instructor, or simply someone looking to document dance movements, this tutorial will provide you with the foundational knowledge to start drawing dance with code.
Why Use LaTeX and TikZ for Dance Diagrams?
LaTeX is renowned for its ability to produce high-quality documents, especially in technical and academic fields. Combined with TikZ, a powerful package for creating graphics, it becomes an ideal tool for generating dance diagrams for several reasons:
- Precision and Control: TikZ allows for meticulous control over every aspect of your drawing. You define shapes, positions, rotations, and styles with code, ensuring accuracy and consistency throughout your diagrams. This precision is essential for clearly representing dance steps.
- Scalability and Vector Graphics: TikZ generates vector graphics. This means your dance diagrams will scale perfectly without any loss of quality, whether you need to display them on a screen or print them in a large format.
- Professional Look: LaTeX documents inherently possess a polished and professional aesthetic. Using TikZ for your dance diagrams ensures they integrate seamlessly with text, creating a unified and elegant presentation.
- Automation and Reusability: Once you define elements like foot shapes, you can reuse them throughout your document. You can also create macros or commands to automate repetitive drawing tasks, making the process efficient for complex choreographies.
- Integration with Text and Notation: LaTeX excels at typesetting mathematical notation and complex text structures. This makes it easy to combine your dance diagrams with written explanations, step names, counts, and other relevant information within the same document.
Creating Basic Foot Shapes with TikZ
Let’s start by dissecting the provided TikZ code for creating basic foot shapes. The initial code defines a command rifoot to draw a right foot and lefoot for the left foot (which is simply a reflection of the right foot).
documentclass{article}
usepackage{tikz}
usepackage{graphicx}
newcommandrifoot{%
  begin{tikzpicture}[scale=0.4]
    path[fill=black] (0,0) -- (3,0) -- (2,-5) -- (0,-5) -- cycle;
    fill (1.5,0) circle (1.5);
    fill (1,-5.5) circle (1);
    fill[white] (0,-5) rectangle (2,-5.5);
  end{tikzpicture}}
newcommandlefoot{scalebox{-1}[1]{rifoot}}
Explanation:
documentclass{article},usepackage{tikz},usepackage{graphicx}: Standard LaTeX preamble, loading the necessary packages.tikzis for drawing, andgraphicxis included although not directly used in the first foot definition, it’s good practice to include it when working with graphics.newcommandrifoot{...}: Defines a new command calledrifootwhich will draw a right foot shape when used.begin{tikzpicture}[scale=0.4] ... end{tikzpicture}: This environment is where the TikZ drawing commands go.[scale=0.4]scales down the drawing to a more manageable size.path[fill=black] (0,0) -- (3,0) -- (2,-5) -- (0,-5) -- cycle;: This draws and fills a polygon shape in black. The coordinates(0,0),(3,0),(2,-5),(0,-5)define the vertices of the polygon.--draws lines between these points, andcyclecloses the path back to the starting point. This forms the main body of the foot.fill (1.5,0) circle (1.5);: Draws and fills a circle with a radius of 1.5 units, centered at coordinate(1.5,0). This represents the ball of the foot.fill (1,-5.5) circle (1);: Draws and fills a smaller circle (radius 1) at(1,-5.5)for the heel.fill[white] (0,-5) rectangle (2,-5.5);: Draws and fills a white rectangle to create a small gap between the heel and the main foot shape, adding a bit more definition.newcommandlefoot{scalebox{-1}[1]{rifoot}}: Defineslefootby taking therifootand horizontally reflecting it usingscalebox{-1}[1]{...}. This efficiently creates the left foot shape from the right foot definition.
This code snippet provides a basic, stylized representation of a foot. You can adjust the coordinates, shapes, and styles within the rifoot command to customize the appearance of your foot diagrams.
 Stylized drawing of a right foot using TikZ code, showcasing a basic representation for dance step diagrams.
Creating a Simple Dance Sequence
Now, let’s see how to use these foot shapes to depict a simple dance sequence, as demonstrated in the original example.
begin{tikzpicture}
  % the feet
  node (l1) at (0,0) {lefoot};
  node (r1) at (2,-2) {rifoot};
  node (l2) at (0,-5) {lefoot};
  node (r2) at (2,-7) {rifoot};
  node[rotate=-80] (l3) at (7,1) {lefoot};
  node[rotate=-120] (r3) at (5.5,-2) {rifoot};
  node[rotate=-120] (r4) at (5.5,-6) {rifoot};
  % the arrows
  draw[ultra thick,->,dashed] (l1.north) to[out=90,in=135] (l3);
  draw[ultra thick,->] ([xshift=-1cm,yshift=0.5cm]r3.east) -- +(0,-2);
  % the labels
  node[font=LARGEsffamilybfseries] at ([xshift=-1cm]l2.west) {1.};
  node[font=LARGEsffamilybfseries] at ([xshift=-1cm]l1.west) {2.};
  node[font=LARGEsffamilybfseries] at ([xshift=3.5cm,yshift=2cm]r3.east) {3.};
  node[font=LARGEsffamilybfseries] at ([xshift=3.5cm,yshift=1cm]r4.east) {4.};
end{tikzpicture}
Explanation:
begin{tikzpicture} ... end{tikzpicture}: Another TikZ environment to draw the sequence.- Nodes for Feet:
node (l1) at (0,0) {lefoot};: This places a left foot (lefoot) at coordinates(0,0)and names this node(l1). Nodes are like containers that can hold content (in this case, our foot shapes) and be easily referenced for positioning and connecting elements.- Similar
nodecommands place right and left feet at different coordinates(r1),(l2),(r2),(l3),(r3),(r4), creating a sequence of foot positions. node[rotate=-80] (l3) at (7,1) {lefoot};: The[rotate=-80]option rotates the left foot node(l3)by -80 degrees. This is how different orientations of the feet are achieved.
- Arrows for Movement:
draw[ultra thick,->,dashed] (l1.north) to[out=90,in=135] (l3);: This draws a dashed arrow from thenorthanchor of node(l1)to the(l3)node.[ultra thick,->]sets the arrow style to be thick and with an arrowhead.to[out=90,in=135]specifies the direction of the curve leaving(l1)(out at 90 degrees – straight up) and entering(l3)(in at 135 degrees). This arrow indicates movement from position 1 to position 3.draw[ultra thick,->] ([xshift=-1cm,yshift=0.5cm]r3.east) -- +(0,-2);: Draws a solid arrow starting from a point slightly offset from theeastanchor of node(r3)and going down 2 units+(0,-2).[xshift=-1cm,yshift=0.5cm]adjusts the starting point of the arrow relative to(r3.east).
- Labels for Steps:
node[font=LARGEsffamilybfseries] at ([xshift=-1cm]l2.west) {1.};: Places a node with the label “1.” to indicate step number 1, positioned to the west of node(l2).[font=LARGEsffamilybfseries]sets the font style for the label to be large, sans-serif, and bold. Similarnodecommands add labels “2.”, “3.”, and “4.” to other steps.
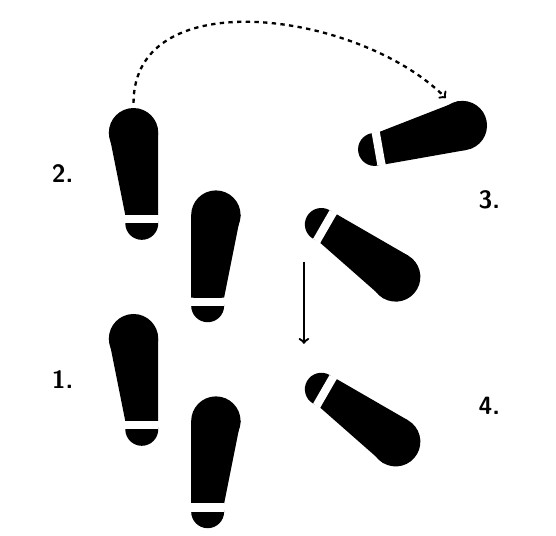
This TikZ code effectively visualizes a sequence of dance steps by placing foot shapes at different positions, orientations, and connecting them with arrows to indicate movement flow. The labels clearly number the steps for easy understanding.
 Dance step diagram created with TikZ, showing foot positions, movement arrows, and step numbers.
Enhancing Foot Shape Design with Images
While the basic shapes are functional, you might want more visually appealing or detailed foot representations. The second example in the original article demonstrates using pre-made PNG images for the foot shapes.
documentclass{article}
usepackage{tikz}
usepackage{graphicx}
newcommandrifoot{includegraphics[scale=0.7]{rifoot}}
newcommandlefoot{includegraphics[scale=0.7]{lefoot}}
begin{document}
begin{tikzpicture}
  % the feet
  node (l1) at (0,0) {lefoot};
  node (r1) at (0.7,-0.7) {rifoot};
  node (l2) at (0,-2) {lefoot};
  node (r2) at (0.7,-2.7) {rifoot};
  node[rotate=-60] (l3) at (2.8,-0) {lefoot};
  node[rotate=-120] (r3) at (2,-0.8) {rifoot};
  node[rotate=-120] (r4) at (2,-2.5) {rifoot};
  % the arrows
  draw[ultra thick,->,dashed] (l1.north) to[out=90,in=90] (l3.west);
  draw[ultra thick,->] ([xshift=-10pt,yshift=0pt]r3.east) -- +(0,-1);
  % the labels
  node[font=LARGEsffamilybfseries] at ([xshift=-1cm]l2.west) {1.};
  node[font=LARGEsffamilybfseries] at ([xshift=-1cm]l1.west) {2.};
  node[font=LARGEsffamilybfseries] at ([xshift=1.7cm,yshift=0.5cm]r3.east) {3.};
  node[font=LARGEsffamilybfseries] at ([xshift=1.7cm]r4.east) {4.};
end{tikzpicture}
end{document}
Key Changes:
newcommandrifoot{includegraphics[scale=0.7]{rifoot}}: Instead of drawing the foot shape with TikZ commands,rifootis now defined to include an image file named “rifoot” usingincludegraphics.[scale=0.7]scales the image.newcommandlefoot{includegraphics[scale=0.7]{lefoot}}: Similarly,lefootincludes the “lefoot” image.
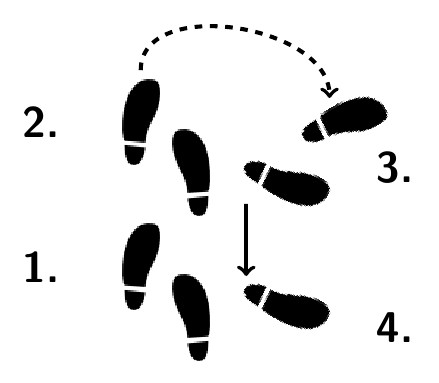
The rest of the code for positioning, rotating, arrows, and labels remains largely the same. The main difference is the visual appearance of the feet, now determined by the external PNG images “rifoot.png” and “lefoot.png”.
This approach offers flexibility. You can create detailed foot illustrations using external graphics software and then easily incorporate them into your LaTeX dance diagrams using TikZ. Ensure that the image files “rifoot.png” and “lefoot.png” are in the same directory as your LaTeX document or provide the correct path to the image files.
Advanced Techniques and Further Exploration
This guide has covered the basics of drawing dance steps with LaTeX and TikZ. To further enhance your diagrams, consider exploring these advanced techniques:
- Customizing Foot Shapes: Experiment with different TikZ shapes, paths, and styles to create unique and expressive foot representations.
- Adding More Detail: Incorporate details like toe direction, heel lifts, or weight distribution using TikZ’s drawing capabilities or by creating more detailed image-based foot shapes.
- Complex Movement Paths: Use more sophisticated arrow styles (e.g., curved arrows, arrows with different heads/tails) to represent complex movement trajectories or stylistic nuances.
- Color and Styling: Apply colors, shading, and different line thicknesses to highlight specific aspects of the dance steps or create visually engaging diagrams.
- Combining with Dance Notation: Integrate standard dance notation symbols (e.g., Labanotation, Benesh Movement Notation) with your TikZ diagrams for a comprehensive representation.
- Animation (with limitations): While LaTeX is primarily for static documents, you can explore creating a series of diagrams to represent a sequence of movements over time, effectively creating a rudimentary animation.
By mastering the fundamentals of TikZ and experimenting with these advanced techniques, you can create highly informative and visually appealing dance diagrams that enhance your choreography, teaching materials, and dance documentation. The combination of LaTeX’s typesetting power and TikZ’s graphical capabilities offers a robust and versatile solution for anyone needing to visually represent dance.