
Planning an event with dancing? Renting a dance floor can be surprisingly expensive, often costing hundreds of dollars. But what if you could create a fantastic dance floor yourself for a fraction of the price? This tutorial will guide you through building your own Diy Dance Floor using readily available materials like plywood and lumber. It’s easier and more budget-friendly than you might think, perfect for weddings, parties, or any event where you want to get your groove on!
 DIY dance floor project in progress
Like many, when planning an event with a live band, the thought of a dance floor immediately came to mind. However, exploring rental options quickly revealed a significant expense. For the size needed, quotes ranged from $700 to $800 – a considerable sum that wasn’t in the budget. This sparked the idea: why not build one?
Initially, securing a pre-made dance floor proved challenging with several arrangements falling through unexpectedly close to the event date. With determination and a can-do attitude, the decision was made to embark on a DIY dance floor project just days before the big day. With some teamwork and readily available materials from a local home improvement store, a fantastic dance floor was created, proving to be a much more affordable and personalized solution.
Gather Your Dance Floor Supplies
Before you begin building your dance floor, gather all the necessary materials. This list provides what was used for a 12 x 16 foot dance floor, but you can adjust quantities based on your desired size.
- Plywood Sheets: 6 sheets of 1/2″ plywood. Plywood provides a smooth, sturdy surface for dancing.
- Lumber for Framing: 30 eight-foot long 2 x 3’s. These will form the support frame for your dance floor sections.
- Cutting Lumber: Have 18 of the 2 x 3’s cut into 45″ pieces at the store (free service at most home improvement stores). This will leave you with 12 full 8-foot boards and several shorter pieces, optimizing material usage.
- Nails and Hammer: For assembling the wooden frames and attaching the plywood. Consider using screws for added durability if preferred.
- Floor Paint: Choose floor paint in your desired colors. For a classic checkerboard look, black and white are ideal. Ensure it’s suitable for wood and high-traffic areas.
- Painting Supplies: Primer, paint brushes, rollers, paint trays, and drop cloths to protect your work area.
- Painter’s Tape: For creating crisp lines when painting patterns like checkerboards.
- Mending Plates: 6 mending plates to securely join the dance floor sections together once assembled.
Dance Floor Dimensions: Planning Your Space
This guide creates a dance floor measuring 12 feet by 16 feet. It’s constructed from six individual sections, each 4 feet by 8 feet, matching the standard size of plywood sheets. This modular design makes transportation, setup, and storage easier. Adjust the number of sections to customize the dance floor size to fit your event space.
Step-by-Step Guide: Building Your DIY Dance Floor
Building your own dance floor is a rewarding DIY project. Follow these steps to create a sturdy and stylish dance space for your event.
1. Constructing the Wooden Frames
- Create Rectangular Frames: Using the 2 x 3 lumber pieces, assemble six rectangular frames, each measuring 4 feet by 8 feet. These frames will provide the structural support for each dance floor section. Ensure corners are square for a level dance surface.
DIY dance floor project in progress
2. Adding Frame Support
- Internal Supports: For each 4×8 frame, add four support pieces evenly spaced across the 4-foot width. These internal supports provide extra strength and prevent the plywood from flexing under the weight of dancers. Secure these support pieces firmly within the frame.
DIY dance floor project in progress
3. Attaching the Plywood Surface
- Secure Plywood Sheets: Place a sheet of plywood on top of each completed wooden frame. Nail or screw the plywood securely to the frame, ensuring it’s flush and even. Fasten along all edges and into the support pieces for maximum stability. This creates the smooth, solid dance surface.
4. Priming and Base Coating
- Apply Primer: Once all sections are built, prime the plywood surfaces. Primer helps the paint adhere better and provides a uniform base coat. Allow the primer to dry completely according to the manufacturer’s instructions.
- Apply Base Coat: Apply your base coat of floor paint to each section. For a checkerboard design, white is a classic base. Apply two coats for good coverage, allowing each coat to dry thoroughly.
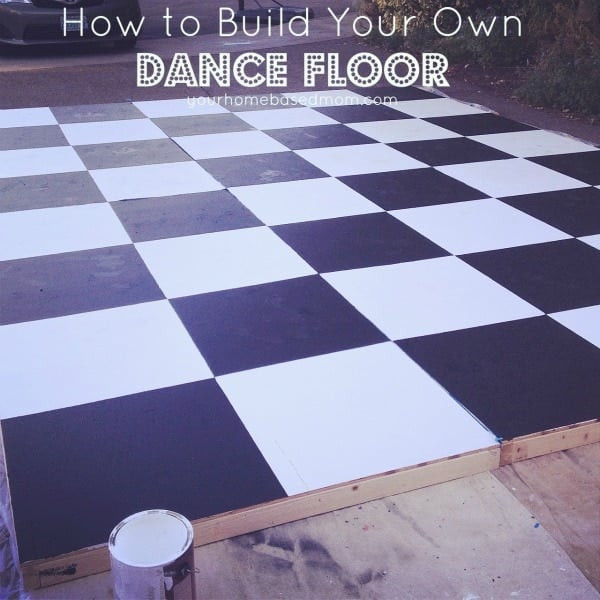
5. Creating the Checkerboard Pattern (Optional)
- Taping off Squares: After the base coat is completely dry, use painter’s tape to mark out your checkerboard squares. For 24″ x 24″ squares on a 4 x 8 section, you’ll have a 2×4 grid. Ensure tape lines are straight and firmly pressed down to prevent paint bleed.
DIY dance floor project in progress
- Painting Squares: Using foam rollers, apply your second paint color (e.g., black for checkerboard) to the taped-off squares. Apply even coats and avoid over-saturating the roller to prevent paint from seeping under the tape.
- Removing Tape: Carefully remove the painter’s tape while the paint is still slightly wet for the cleanest lines. Allow the paint to dry completely.
DIY dance floor project in progress
6. Numbering Sections for Easy Assembly
- Mark Sections: Number each dance floor section on the underside. This simple step will save time and frustration when assembling the dance floor at your event, ensuring the sections fit together correctly.
7. Assembling and Securing Sections
- Joining with Mending Plates: At your event location, arrange the numbered sections to form your dance floor. Use mending plates to connect the sections together, hammering them in to create a secure and stable dance surface. The mending plates will hold the sections firmly together during use.
Dance Floor Construction Cost Breakdown
One of the biggest advantages of a DIY dance floor is the significant cost savings compared to renting. Here’s an approximate cost breakdown (prices may vary based on location and material choices):
- Plywood (6 sheets): ~$150 – $250 (depending on plywood type and current prices)
- 2×3 Lumber (30 eight-foot boards): ~$50 – $80
- Nails/Screws, Paint, Primer, Tape, Mending Plates: ~$50 – $70
Total Estimated Cost: Approximately $250 – $400
This is a substantial saving compared to rental costs, leaving you with a custom-built dance floor that can be reused for future events!
Enjoy Your DIY Dance Floor!
Building your own dance floor is a satisfying project that not only saves you money but also adds a personal touch to your event. A checkerboard dance floor, or any design you choose, creates a fun and inviting atmosphere for dancing and celebration. Even those initially skeptical about needing a dance floor often agree once they see the finished product and the energy it brings to an event! Get ready to dance the night away on your very own DIY dance floor!