
As October rolls around, the spirit of costume creation is in the air! Following the excitement of last year’s Cruella tutorial, this time we’re diving into the captivating world of Wednesday and her iconic dance dress.
Even if you’re not a devoted viewer of the hit Netflix series Wednesday, chances are you’ve encountered the mesmerizing dress that took center stage. It has quickly become a sought-after design, especially with the series debuting last year, making this Halloween the perfect moment to recreate the Rave’N Dance look.
The visionary behind the show’s costumes is the incredibly talented Colleen Atwood. For those keen to delve deeper into her creative process, you can explore an insightful interview here.
The dress in question, gracefully worn by Jenna Ortega’s Wednesday during the memorable Rave’N Dance in episode 4, is originally from Alaïa’s Fall 2020 collection. This detail highlights the high-fashion origins of a now-iconic piece of pop culture fashion.
A quick online search reveals a vibrant community of creators who have already embraced this design. From organza to satin, lace to tulle, and in varying lengths, the interpretations are diverse and inspiring. For those seeking a pattern to start with, Mood Fabrics offers a fantastic free option known as The Nightshade Dress, providing a valuable resource for your DIY journey.
My Take on the Wednesday Rave’N Dance Dress
In a departure from my usual solo tutorial approach, this time I decided to collaborate and create something unique. Since I didn’t personally need a Wednesday dress, and a half-scale version felt limiting, I sought out someone who would truly appreciate and wear a Wednesday costume for Halloween. Connecting with the international women’s community in Milan led me to Jessica, who enthusiastically agreed to model. This collaboration blossomed into a fun photoshoot around the city, adding an extra layer of creativity to the project.
For this dress, I chose organza, taffeta, and lining fabrics. A 40cm zipper and seven small buttons completed the material list. Together, Jessica and I decided on a slightly shorter length, just below the knees. The synthetic organza I used provided significant volume, which also influenced the length and overall silhouette. The original Alaïa dress likely uses a finer silk organza, which would drape differently.
Let’s get started on crafting your own Wednesday Dance Dress, beginning with the pattern!
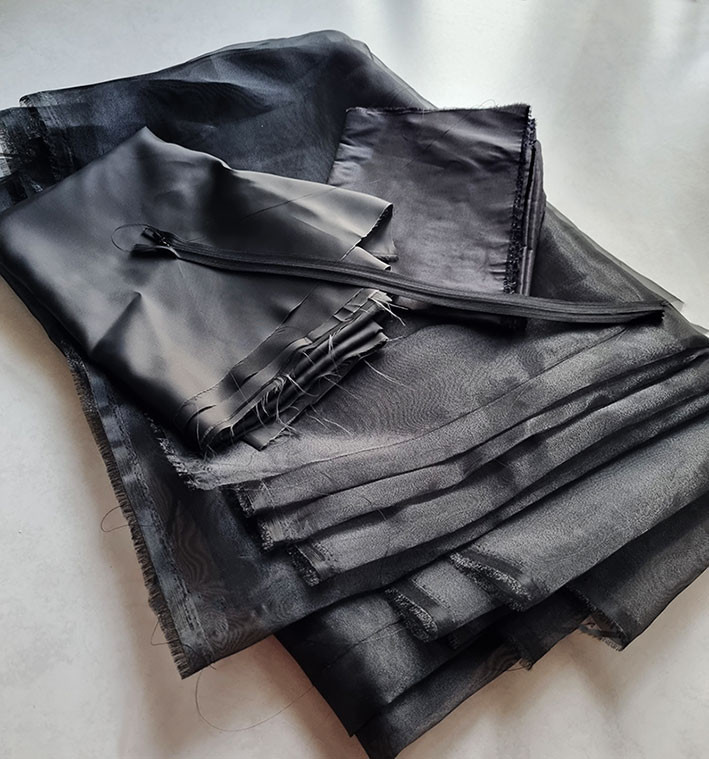 Fabric choices for creating the Wednesday dance dress, including organza, taffeta, lining, zipper, and buttons.
Crafting Your Wednesday Rave’N Dress Pattern
To begin, you’ll need a waist-length basic bodice block. Choose one with either 2cm or 4cm of ease at the underarm, depending on your desired fit. Since the dress is styled with a belt, slight waist volume is less critical. The key is underarm comfort and fit. Starting with 4cm of ease and testing the fit is always a good approach.
We are essentially creating a blouse with dropped shoulders, a button placket, a collar, and a wide back yoke. The yoke is crucial as it allows us to cut the upper back section on the fold and incorporate a zipper in the lower section.
This zipper is essential because the button placket stops at the waist, making the dress difficult to put on without an additional opening. The zipper will extend from the waist downwards, ensuring ease of wear.
Step-by-Step Bodice Pattern Drafting
Follow these steps to draft your bodice pattern:
- Shoulder Dart Adjustment: Shorten the back shoulder line by 1cm to minimize the small back shoulder dart. The remaining dart volume will be converted into ease.
- Back Waist Dart Removal: Eliminate the back waist dart. Redraw it so it ends at the armhole, approximately 2/3 the size of the original dart. Remove the rest of the volume at the side seam. Typically, you’d reduce volume at the center back, but for this design, maintain a straight center back line. Close the dart and reshape the waistline.
- Dart Rotation: Rotate the bust dart towards the armhole and the front waist dart towards the side seam. The bust dart will be concealed by the ruffles. Note that the original Alaïa dress appears to feature princess seams, an alternative design detail to consider for future variations.
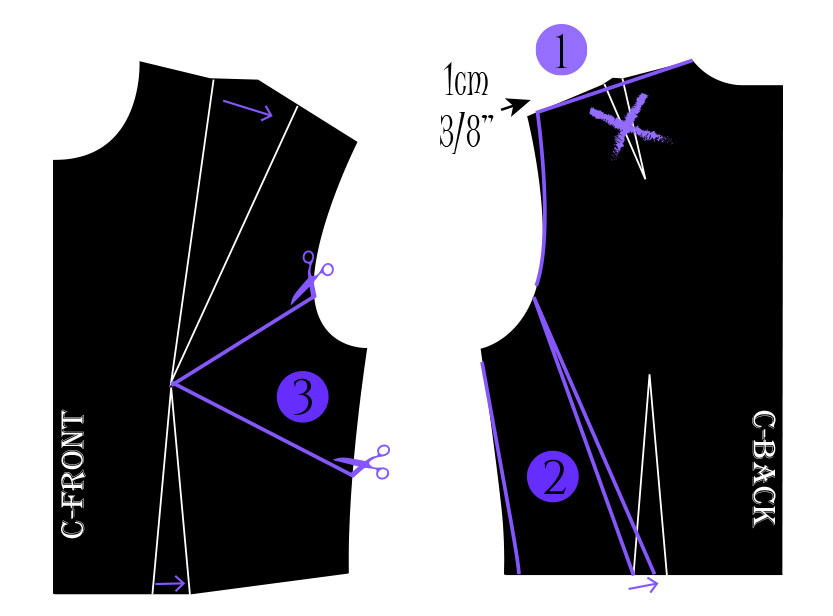 Pattern adjustments including dart manipulation and shoulder adjustments for the Wednesday dance dress bodice.
- Dropped Shoulder Line: Draw the dropped shoulder line. Raise the new shoulder line by 0.5cm at the shoulder tip to provide extra room. Extend the shoulder slope by 3cm. Curve the line slightly downwards after the shoulder tip. The armhole shape can be refined once you determine the ruffle placement.
- Back Yoke Line: Draw the back yoke line. Align this line with the lowest ruffle placement, as the seam will be hidden beneath it for a clean finish.
- Button Placket Addition: Add the button placket. The finished width should be 2.5cm with two folds. Separate the button placket 1.25cm inward from the center front line to accommodate the full placket width. This piece will be cut from taffeta.
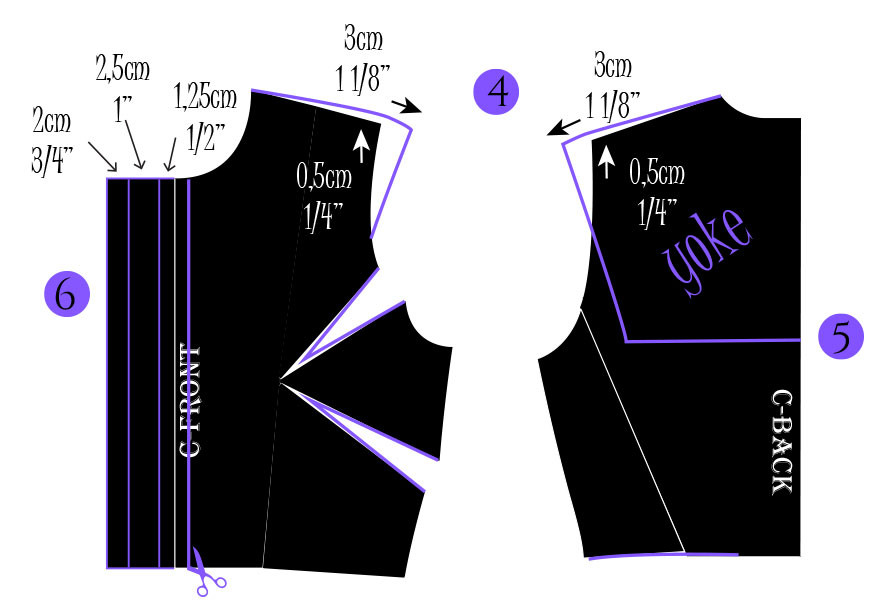 Further pattern adjustments including dropped shoulders, back yoke, and button placket for the Wednesday dress bodice.
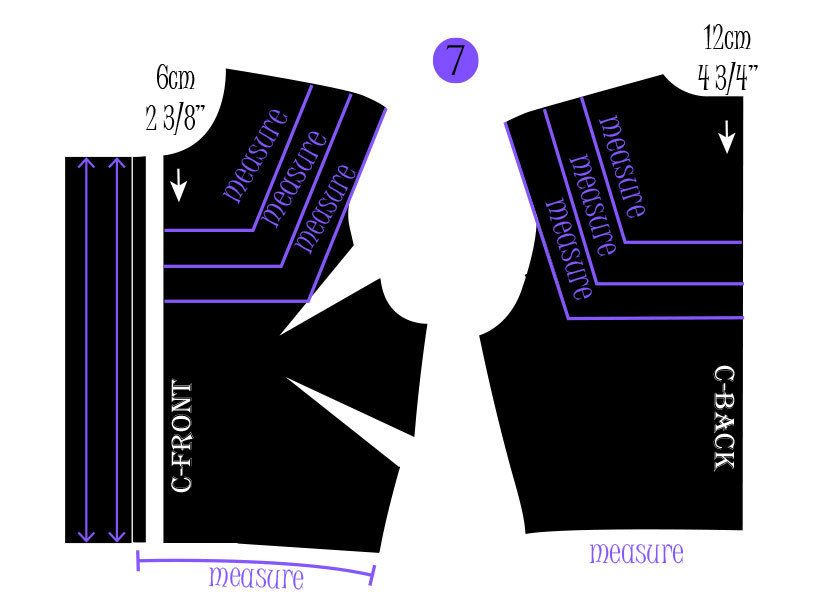
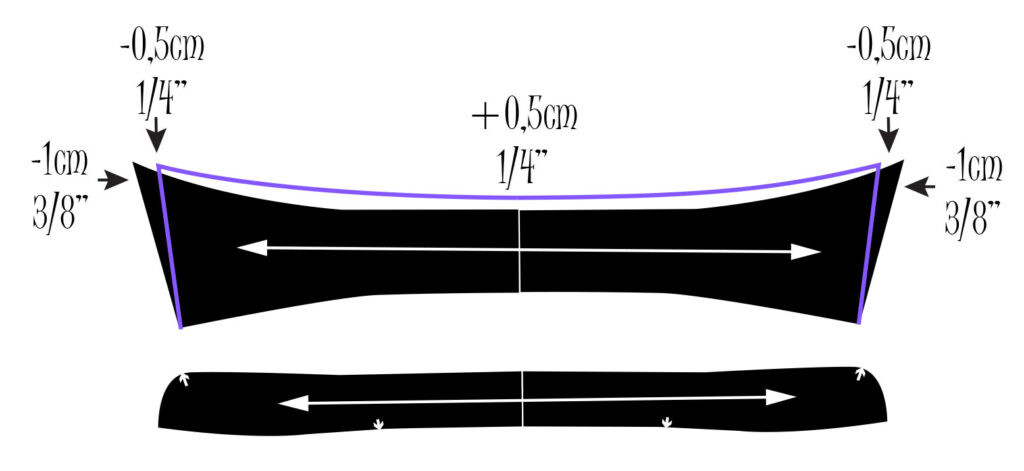
- Ruffle Placement Lines: Determine and draw the placement lines for the three rows of ruffles. In my version, the first row was positioned 6cm below the neckline at the front and 12cm at the center back, with approximately 3-3.5cm spacing between rows. Adjust the armhole curve to seamlessly integrate with the ruffle lines. The lowest ruffle row will define the edge of the short “sleeve.”
Measure each ruffle placement line on both the front and back pattern pieces separately. This will give you the precise measurements needed to calculate the ruffle lengths.
 Ruffle placement lines marked on the bodice pattern for the Wednesday Rave'N dress.
Also, measure the waistline of your bodice pattern, starting from the center front. This measurement is crucial for drafting the skirt pattern to ensure a perfect match between the bodice and skirt.
For the ruffles, I opted for 12cm high strips. Remember to double the hem allowance, as both edges of the ruffles will be hemmed. The length of each ruffle strip will be twice the target measurement. Calculate the lengths for all three ruffle pieces and mark the shoulder line position with a notch on each ruffle pattern piece.
For these straight ruffle strips, a pattern is not strictly necessary. You can simply note down the calculated measurements and directly rip the organza strips to size.
Designing the Collar
The collar pattern is based on a basic shirt collar design. If you’re familiar with shirt collar drafting, you can proceed from there. For a more detailed guide, you can refer to my video tutorial or my comprehensive Collar Galore guide. If you prefer a less fitted collar, slightly enlarge the bodice neckline before drafting your collar pattern.
Once you have your basic shirt collar pattern, make the following adjustments to create the Wednesday dress collar:
 Collar pattern adjustments for the Wednesday Rave'N dress, showing modifications to the basic shirt collar pattern.
The collar stand pattern remains unchanged. These adjustments refine the collar shape to match the distinctive style of the Wednesday dance dress.
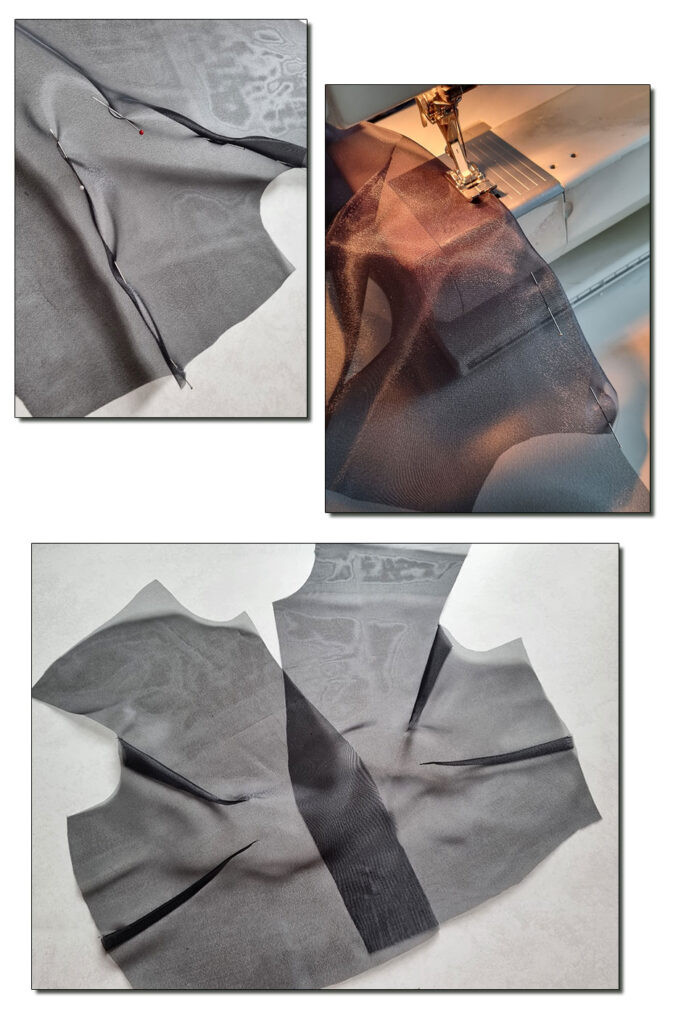
Drafting the Tiered Skirt Pattern
The skirt of the Wednesday dress features three tiers. In my design, the lowest tier is intentionally hidden beneath the second, adding volume without being fully visible. I also opted for a smooth upper section of the first tier to control the organza’s natural puffiness.
To achieve a skirt closer to the original dress, consider using a gypsy skirt pattern for the first tier, as demonstrated in my tutorial here.
For a simplified approach, we’ll draft a flared skirt pattern. This method is perfect for those seeking a quicker, easier pattern.
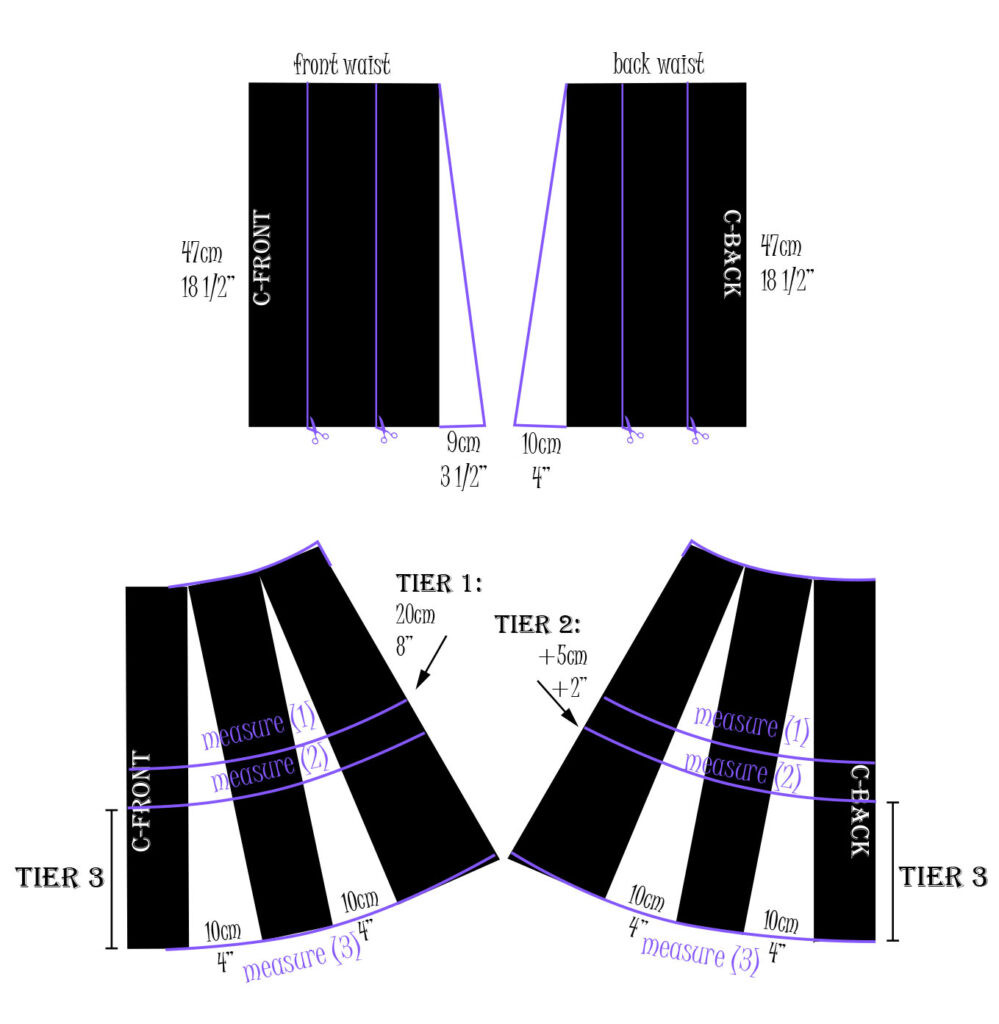
Use the bodice waist measurement as the width for the skirt’s top edge. The length shown in the diagram is an example; adjust it to your desired dress length. The third tier ruffle, attached at the hem, will contribute to the final skirt length.
Add 9cm of flare at the side seam for the front piece and 10cm for the back piece. Introduce additional volume (10cm for both front and back) using the slash & spread method. Redraw the pattern lines to incorporate these adjustments.
 Skirt pattern drafting for the Wednesday Rave'N dress, showing flare and tier divisions.
Divide the skirt pattern into three sections to define the tiers. I made the first tier 20cm high, the second tier 5cm longer than the first, and the third tier extending to the hemline.
Measure the hemline of each tier, front and back pieces separately. These measurements are essential for calculating the ruffle lengths for each tier.
Trace the pattern pieces for the first tier. Separating the pattern along the second tier line will leave you with the patterns for the second and third tiers.
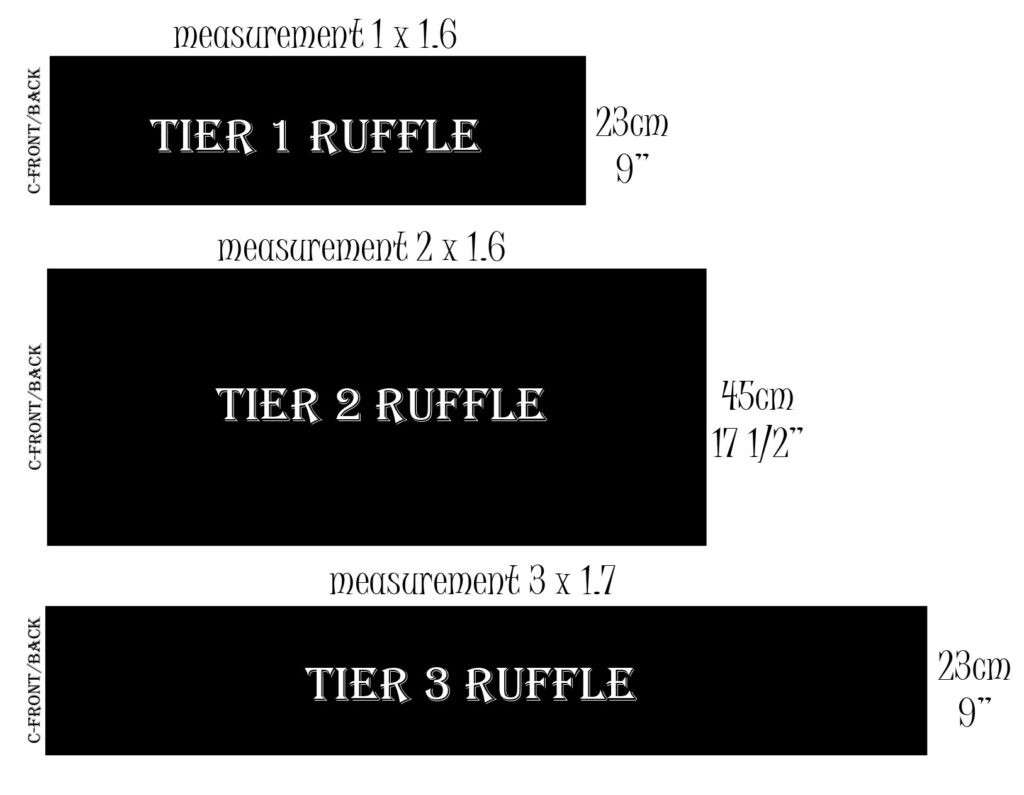
These were the ruffle heights I used. You can adjust them to your preference, making them longer or shorter. Remember to add seam and hem allowances. Due to the volume of the organza, I reduced the ruffle fullness to 1.6 and 1.7 times the hemline length to manage the overall puffiness.
 Tier height and ruffle calculation details for the Wednesday dance dress skirt.
Similar to the bodice ruffles, you can simply note down the ruffle measurements and cut the fabric strips directly, without needing to draft full patterns.
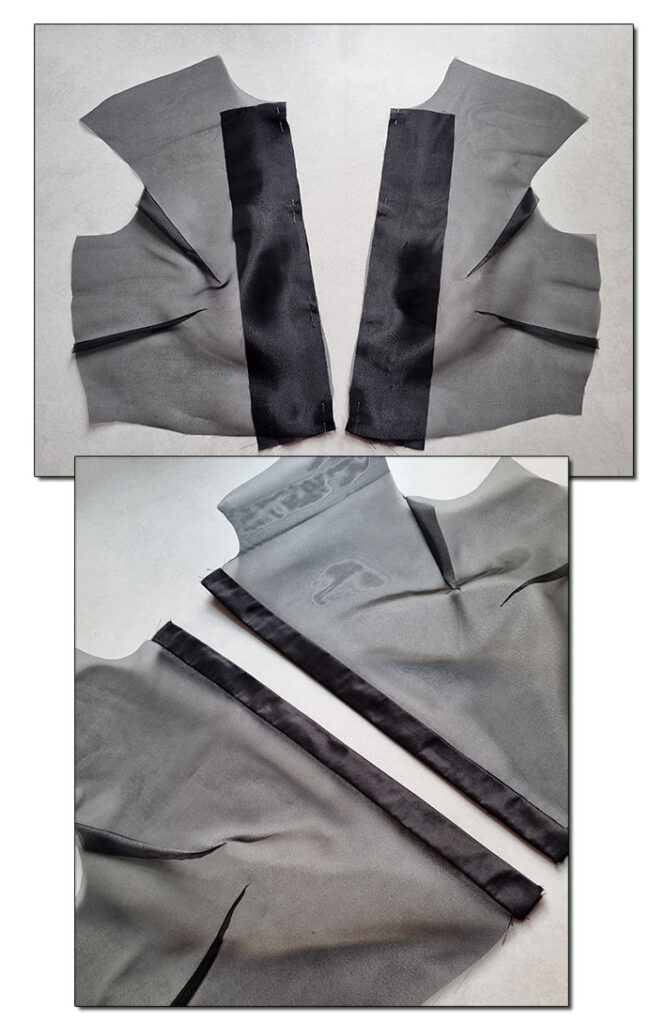
Overview of Wednesday Rave’N Dress Pattern Pieces
Here’s a complete look at all the pattern pieces you’ll need. First, the bodice pieces:
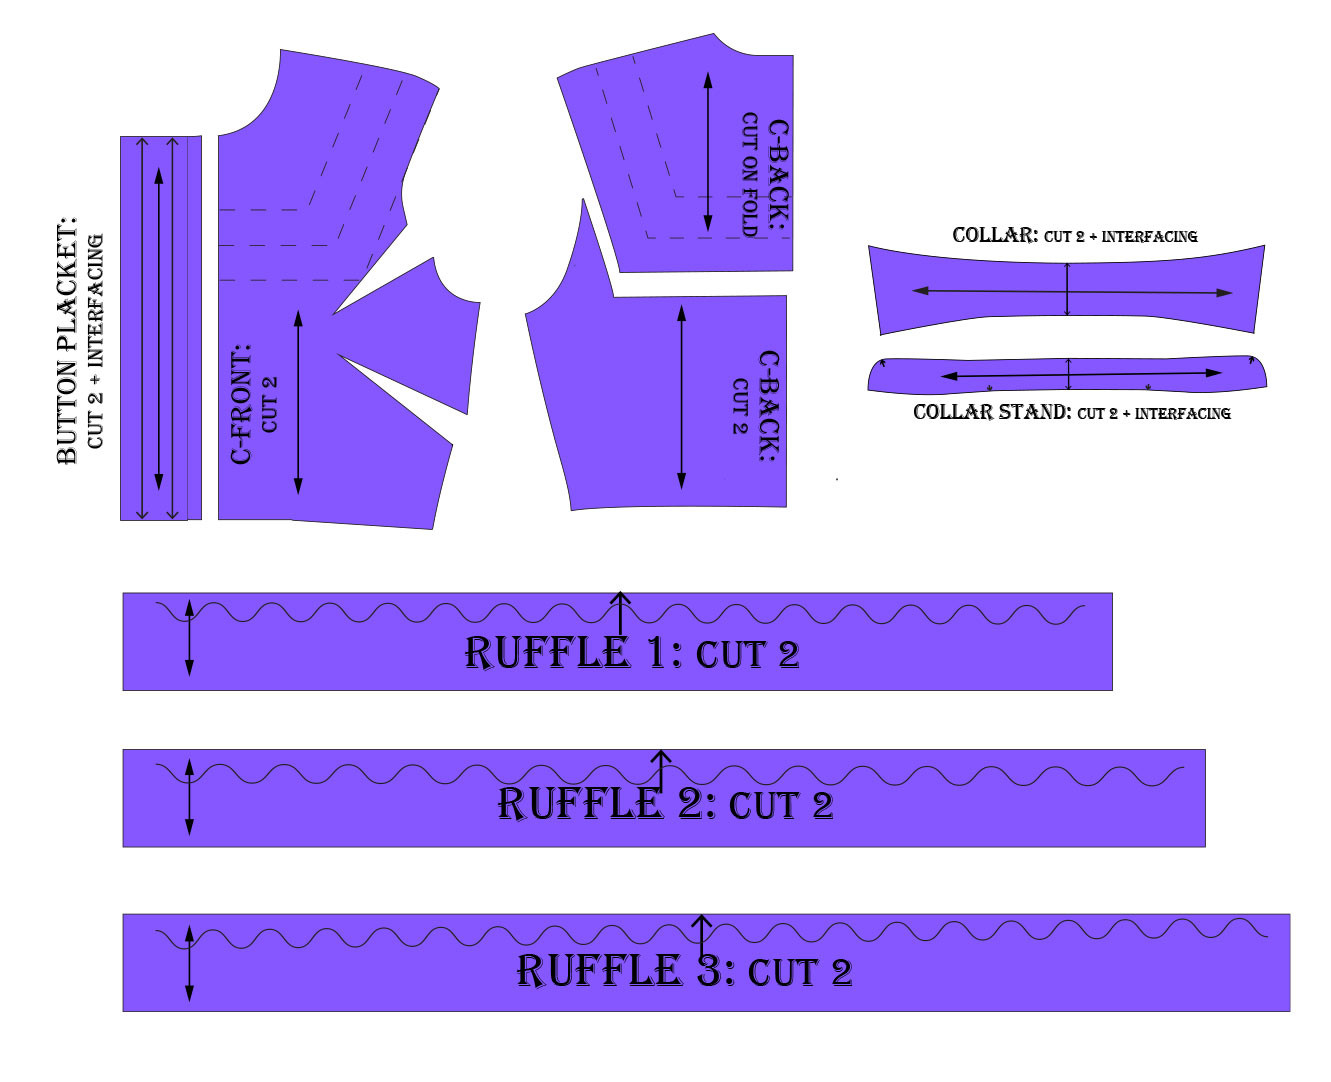 Bodice pattern pieces for the Wednesday Rave'N dress, including front, back, yoke, and button placket.
The collar and button placket are crafted from taffeta and will require interfacing to provide structure.
The ruffles will have a center back seam unless you are working with extra-wide organza that allows you to cut them without seams.
Next, the skirt pattern pieces:
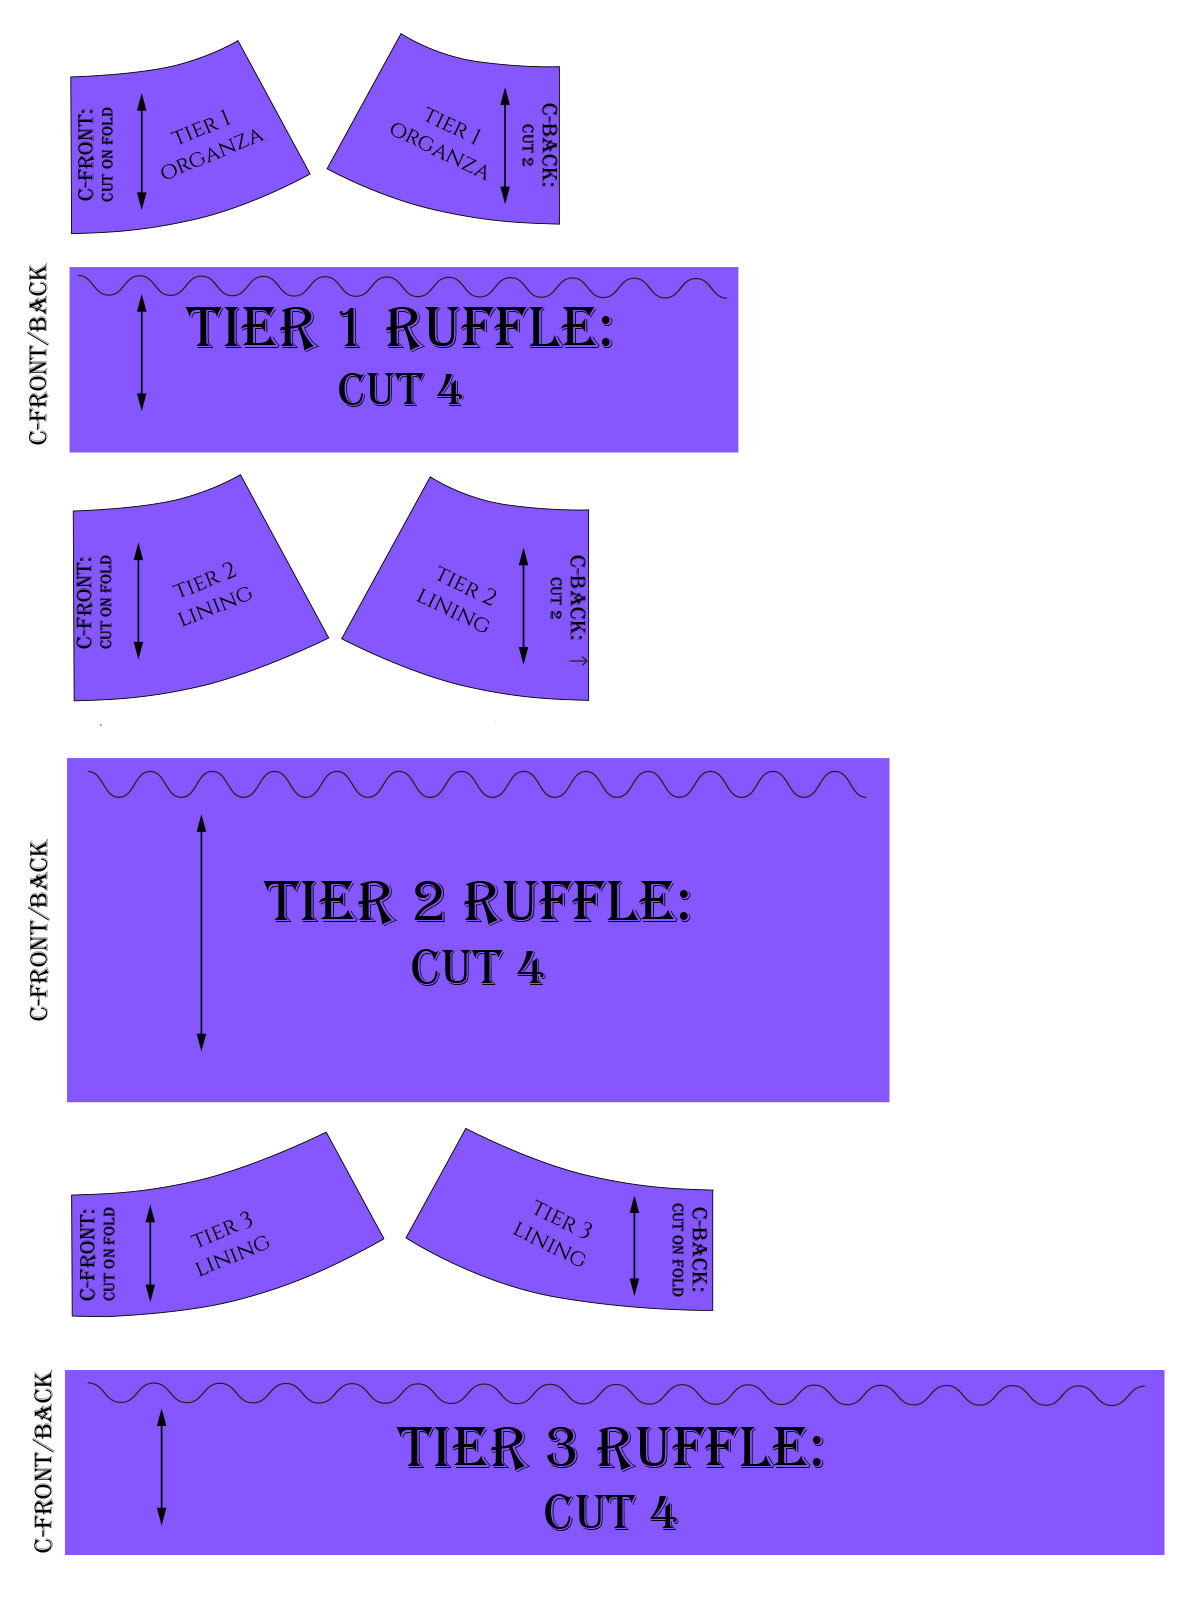 Skirt pattern pieces for the Wednesday Rave'N dance dress, showing the tiered construction.
Tiers 2 and 3 will be cut from lining fabric. Tier 3 can be cut on the fold at the center back, depending on fabric width.
Since my front and back skirt pieces had identical measurements, I cut each ruffle four times. If possible, cutting ruffle pieces twice on the fold will minimize seams.
Sewing Your Wednesday Dress: Step-by-Step Guide
Sewing the Wednesday dress primarily involves hemming and gathering ruffles – processes that are time-consuming but not technically difficult. I’ve created a detailed video showcasing the entire sewing process, and you’ll also find shorter video clips throughout this article to guide you through specific steps.
While the sewing itself isn’t overly complicated, the fabric choice greatly influences the ease of construction. I selected a non-slippery organza, which was relatively manageable, although organza is known for its voluminous nature and can sometimes be unpredictable. Overall, I found the sewing process less challenging than anticipated.
Let’s begin with sewing the bodice.
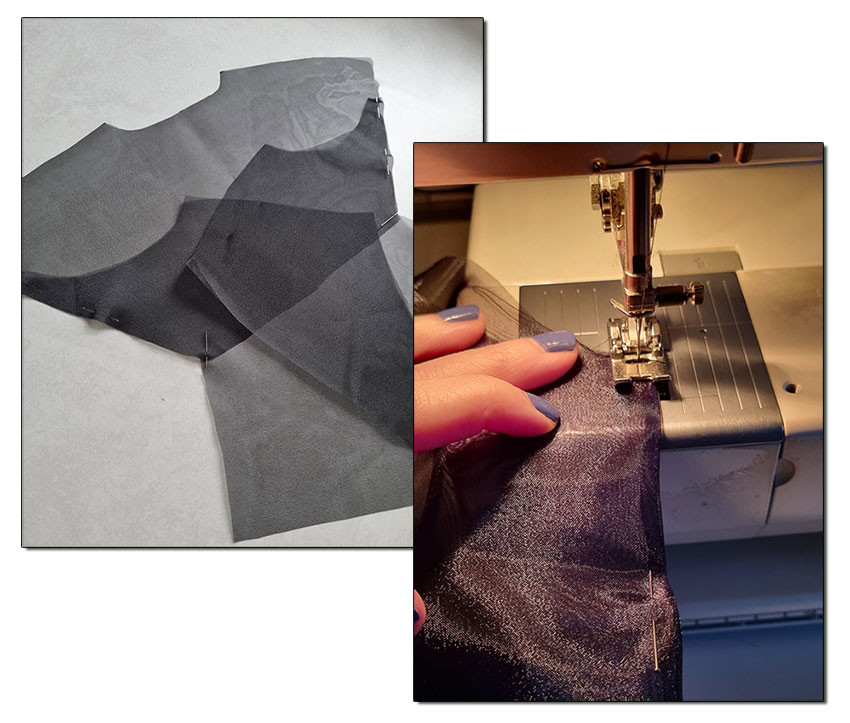
Assembling the Bodice
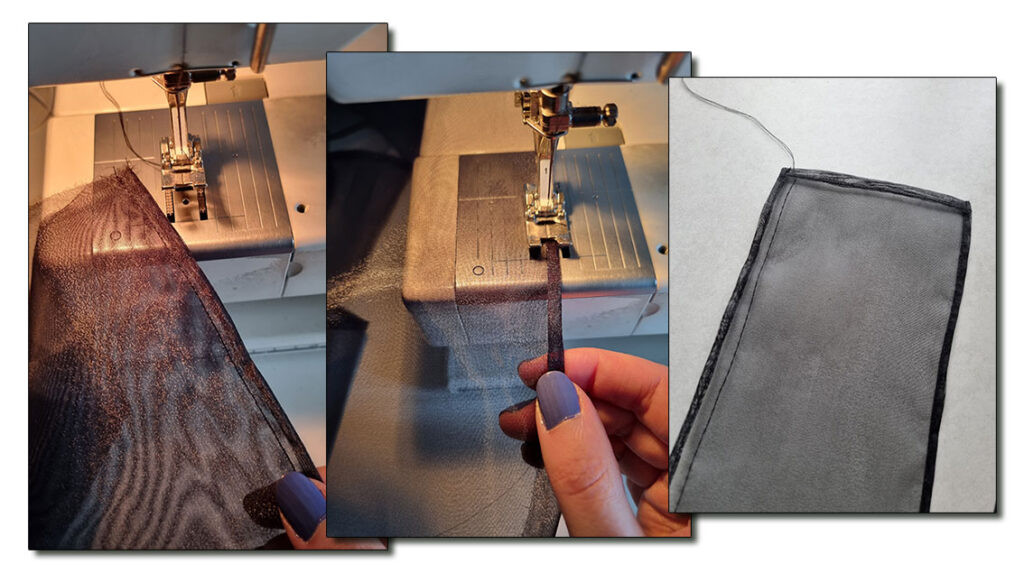
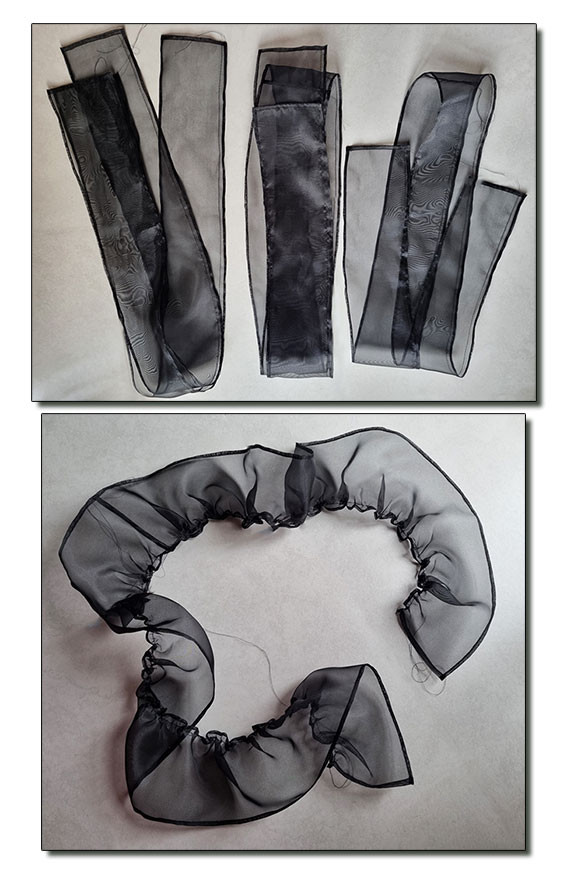
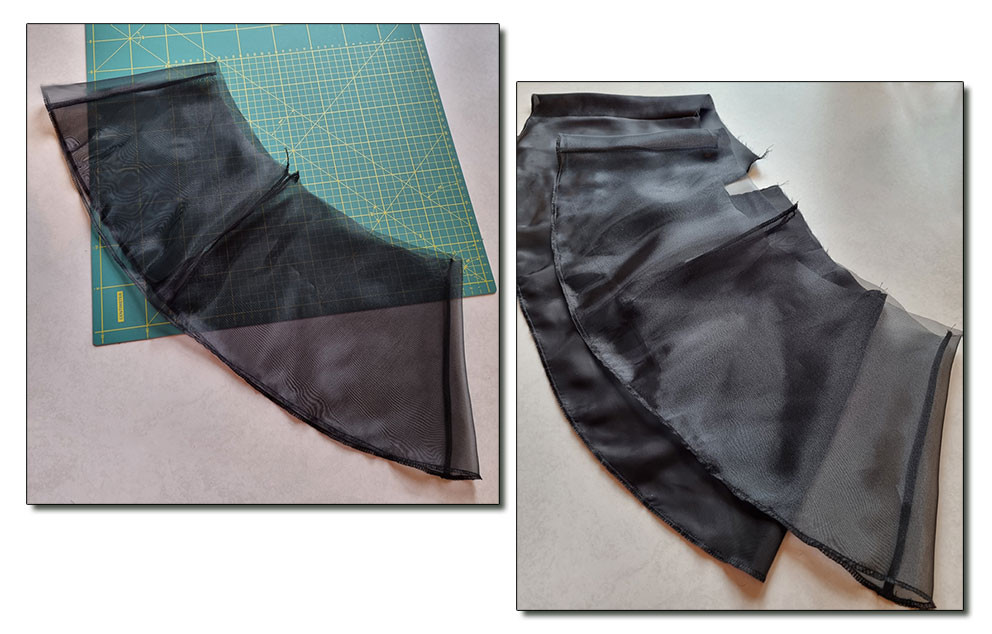
First, I ripped the organza strips for the ruffles and sewed the center back seams using French seams for a clean finish.
Ripping the organza created a slightly bunched thread edge, which proved helpful when hemming the ruffles. All four edges of these ruffles needed hemming as they are sewn directly onto the bodice.
After hemming, I sewed a gathering stitch 1cm below the upper edge of each ruffle.
 Preparing the bodice ruffles by hemming and gathering the organza strips.
Here are the three prepared ruffles, gathered to their target measurements. Remember to mark the shoulder seam positions with pins before gathering to ensure accurate placement!
 Three prepared bodice ruffles, gathered and ready to be attached to the bodice.
Here’s a short video demonstrating the ruffle preparation process.
Next, I assembled the bodice core pieces. These are the components:
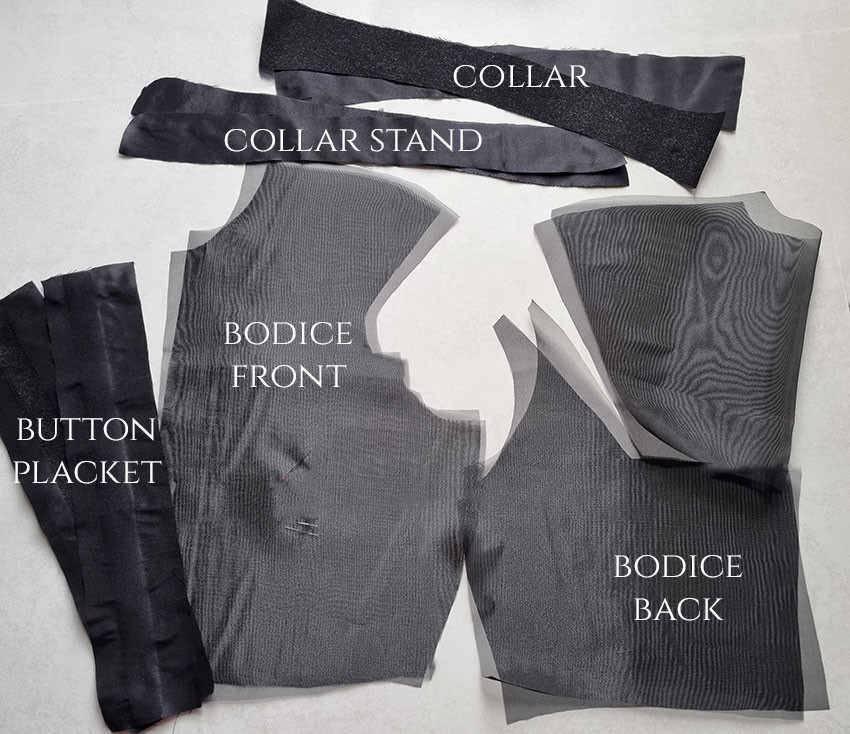 Bodice core pieces laid out, including front, back, yoke, and button placket sections.
Here’s the assembly order:
- I sewed the front darts using only the bobbin thread, as I was working with a sheer fabric. This technique helps minimize bulk and visibility on delicate materials.
 Sewing darts on the sheer organza bodice fabric using a single bobbin thread for a cleaner finish.
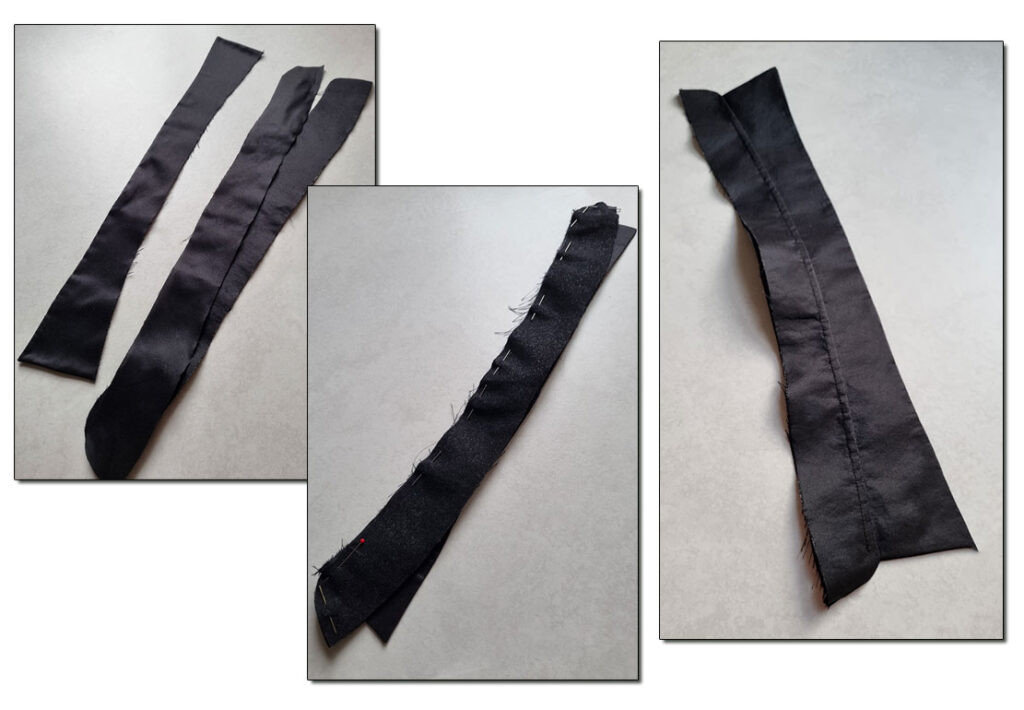
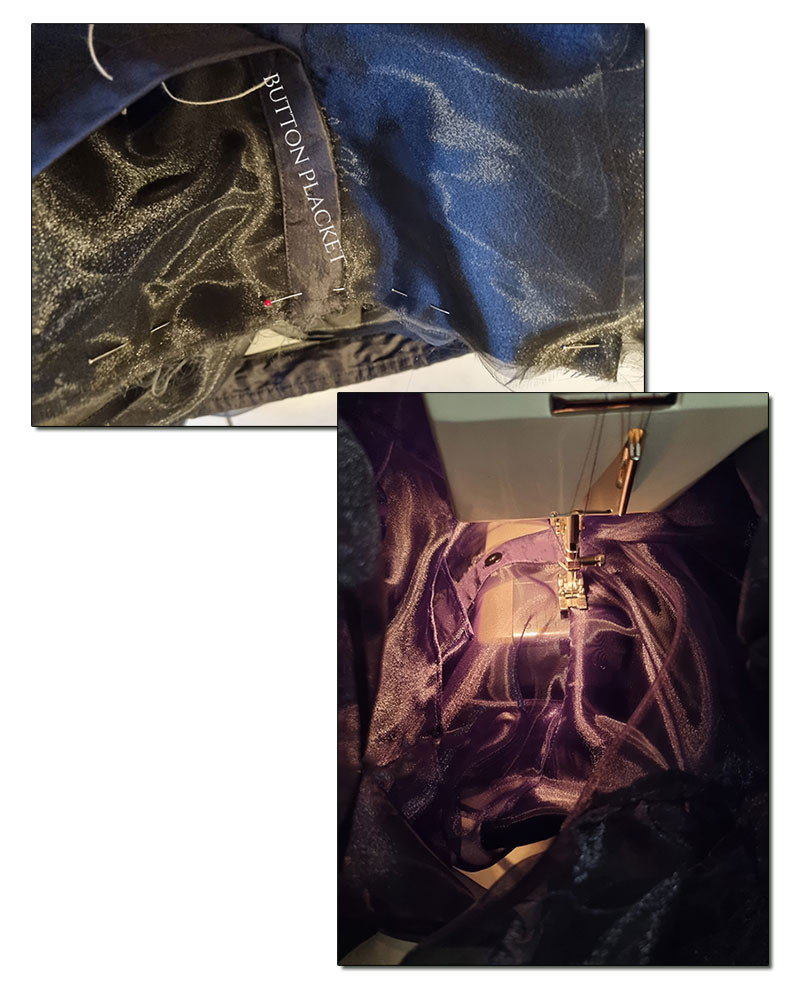
- Attached the button placket. I had partially interfaced these pieces beforehand for added structure. Topstitching the button placket after folding was surprisingly easy because the organza’s transparency allowed for clear visibility of the folded edge!
 Attaching the interfaced button placket to the organza bodice front.
- I attached the back yoke using a French seam, ensuring a neat and enclosed seam on the sheer fabric.
 The back bodice piece with the yoke attached using a clean French seam.
Following this, I sewed the shoulder and side seams. Here is a video summarizing these steps.
I finished the armholes with a bias facing. I cut 2.5cm wide bias strips from the same organza fabric used for the bodice, ensuring a matching and lightweight finish.
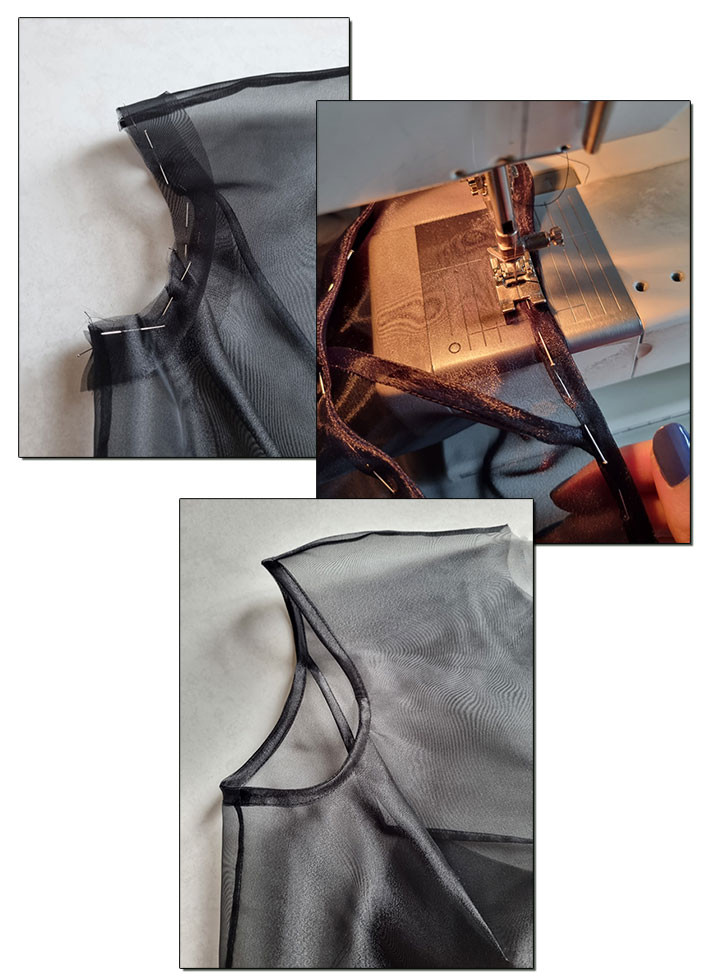 Finishing the armholes of the bodice with a self-fabric organza bias facing.
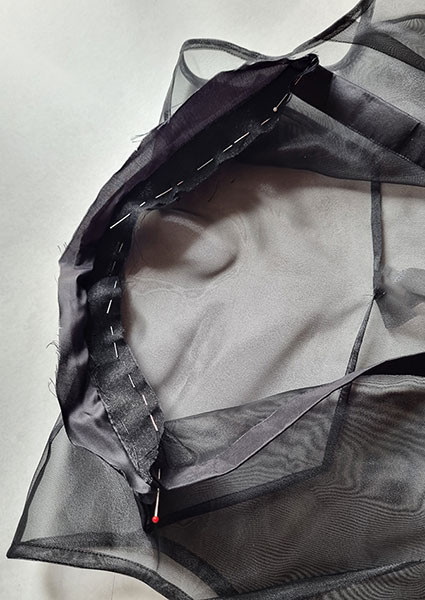
Then came the collar. I interfaced one layer of both the collar and the collar stand for structure. First, sew the collar pieces together, turn it right side out, and press it flat. Then, attach the collar to the collar stand and topstitch the seam for a crisp edge. I have a detailed collar sewing tutorial available here if you need further guidance.
 Preparing the collar by interfacing, sewing, and pressing the collar and collar stand pieces.
Next, I attached the completed collar to the bodice neckline.
 Attaching the prepared collar to the neckline of the Wednesday dress bodice.
With this step, the bodice core was complete. Here’s a video recap of the bodice assembly.
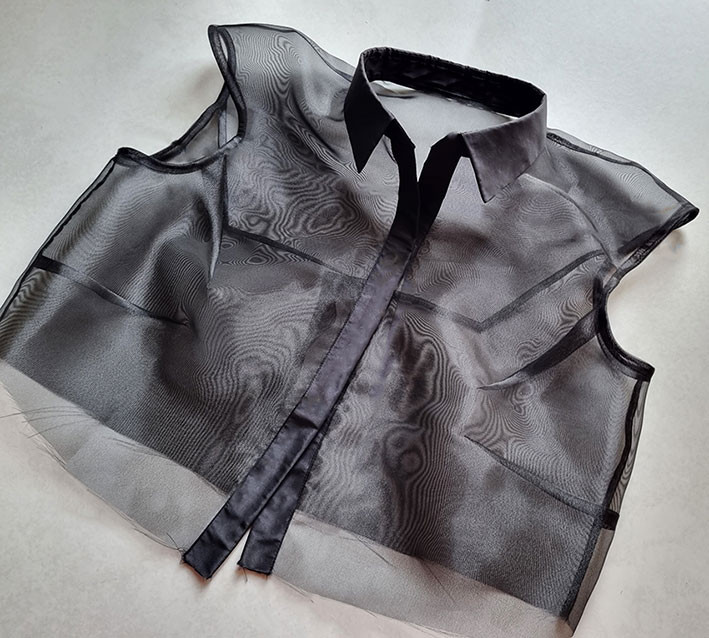 The completed bodice core of the Wednesday Rave'N dress, ready for ruffle attachment.
Attaching the Bodice Ruffles
For attaching the ruffles, I found it helpful to use a dress form. Having the pattern and measuring tape nearby allowed me to accurately pin each ruffle in its intended position, one row at a time. Pins alone weren’t quite enough to secure the ruffles, so I also basted them in place before final stitching.
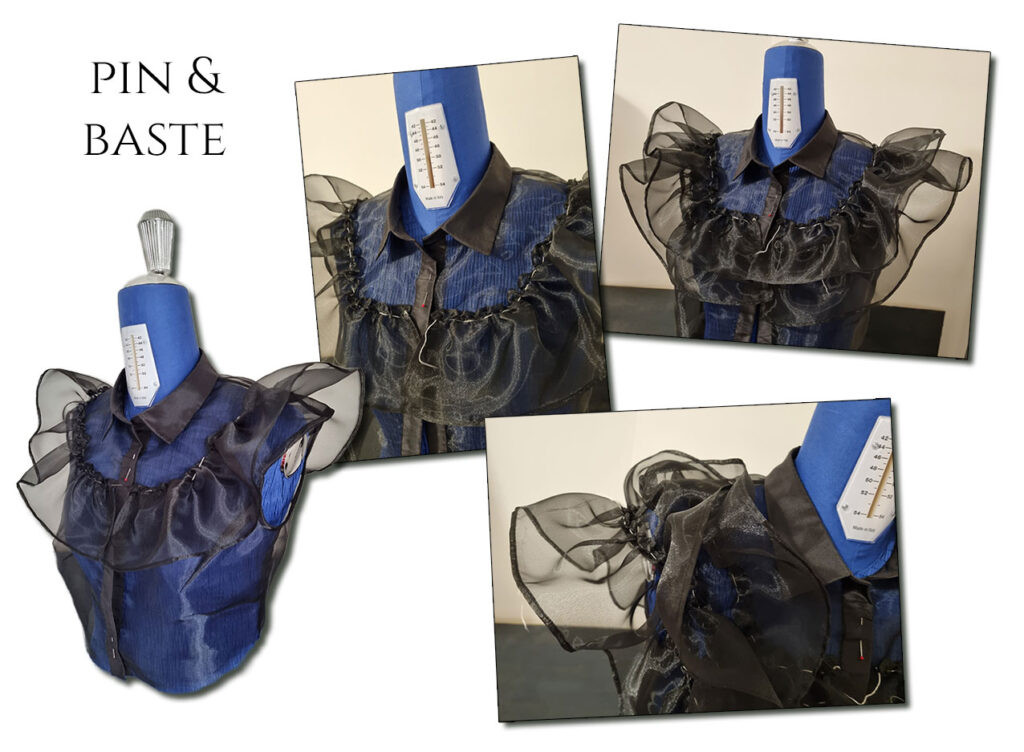 Basting the organza ruffles onto the bodice of the Wednesday dance dress using a dress form.
Here’s the result after basting all the ruffles:
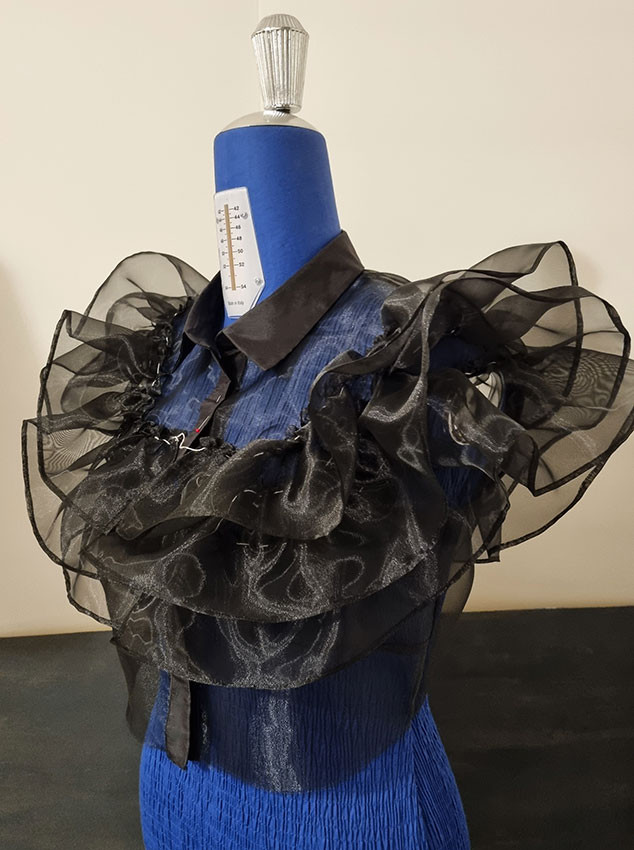 The bodice with all three rows of organza ruffles basted in place, ready for final stitching.
I used a small zig-zag stitch to permanently attach the ruffles, sewing approximately 1cm below the upper edge. After stitching, I removed the basting and gathering stitches.
Finally, I created the buttonholes and sewed on the buttons. The buttons were 1.2cm in diameter, so I made 1.4cm vertical buttonholes along the center front line. Buttonholes were placed on the right placket and buttons on the left.
Another video demonstrating the ruffle stitching and button details.
Sewing the Wednesday Rave’N Skirt Tiers
Sewing the skirt involved fewer steps than the bodice, but required just as much hemming and gathering! Here’s a quick video overview of the skirt construction.
I began by preparing all the ruffle pieces for the skirt tiers. This included sewing French seams on all four ruffle pieces per tier and creating a narrow hem along the lower edge of each ruffle. I finished the upper edge with a serger and added a row of gathering stitches.
Then, I prepared the remaining pieces for each tier. The first tier was cut from organza, and the subsequent two tiers from lining fabric. Here you can see the first two tiers, with the lining tier being 5cm longer than the organza tier. I finished the hemlines of these tiers with a serger.
 The first two skirt tiers of the Wednesday dress, showing the organza outer layer and longer lining layer.
Next, I gathered the first two ruffles to match the hemline of the tiers above (tiers 1 & 2), pinned them in place, and sewed them together.
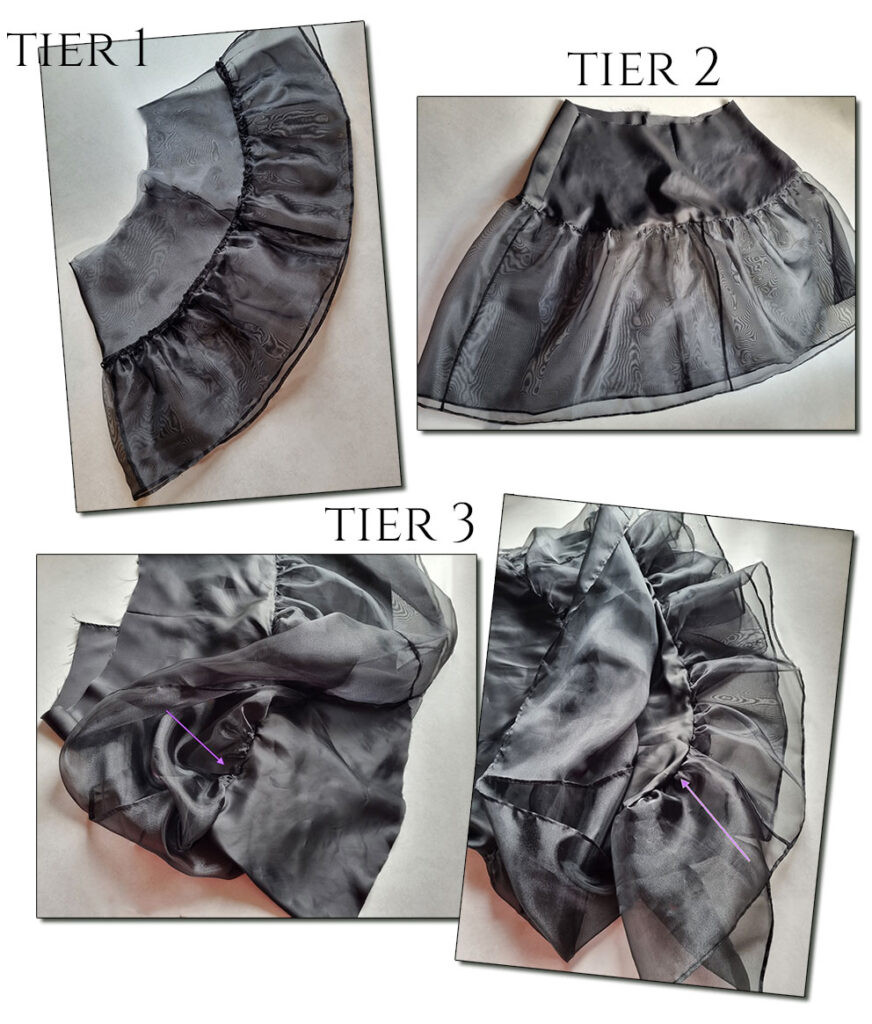 Attaching the gathered ruffle to the second tier of the Wednesday dress skirt.
The tier 3 lining was sewn to the seam allowance of the tier 2 lining and ruffle. Finally, the third ruffle was attached to the hemline of the tier 3 lining.
I sewed the two skirt pieces together at the waist before attaching the skirt to the bodice. I finished this waist seam with a serger and edgestitched the seam allowance upwards towards the skirt.
 Attaching the completed skirt to the bodice waistline of the Wednesday Rave'N dress.
The final step was inserting the invisible zipper at the center back of the dress.
 Inserting an invisible zipper at the center back seam of the Wednesday dance dress.
The Wednesday Dance Dress Reveal
And here is the finished Wednesday Rave’N Dance Dress!
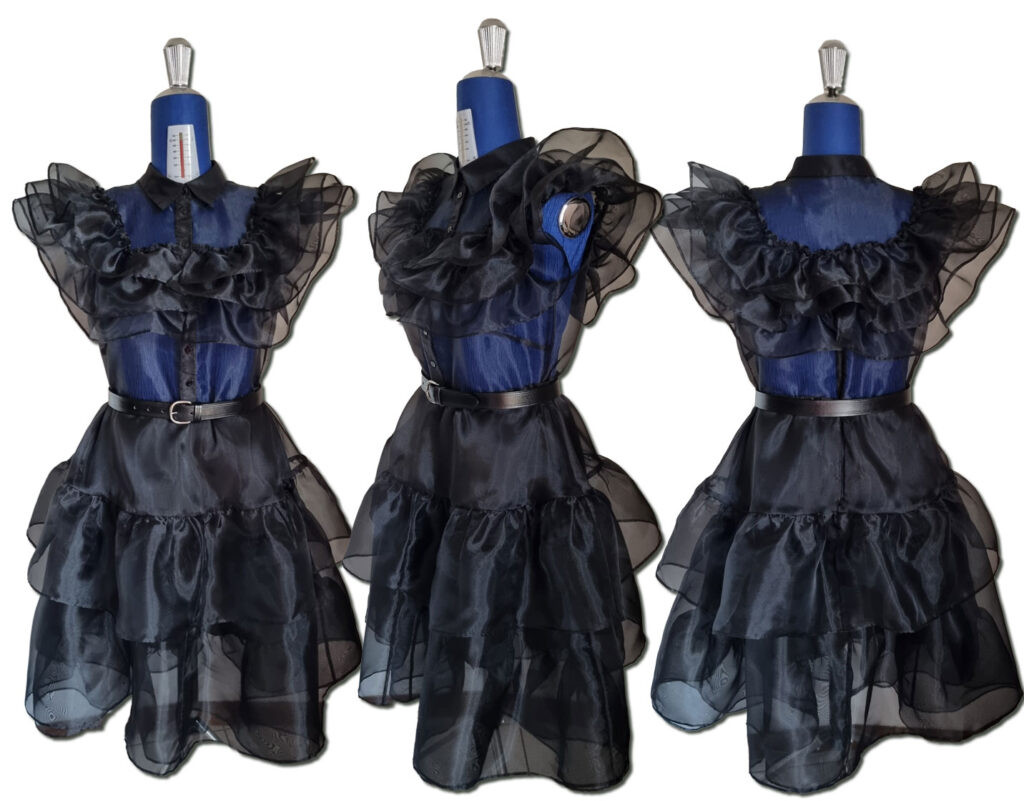 The completed DIY Wednesday Rave'N dance dress, showcasing the organza ruffles and tiered skirt.
We decided to add small, detachable ruffles at the armholes because the organza was quite voluminous and didn’t drape over the arms as much as we wanted. These extra ruffles provided the perfect finishing touch.
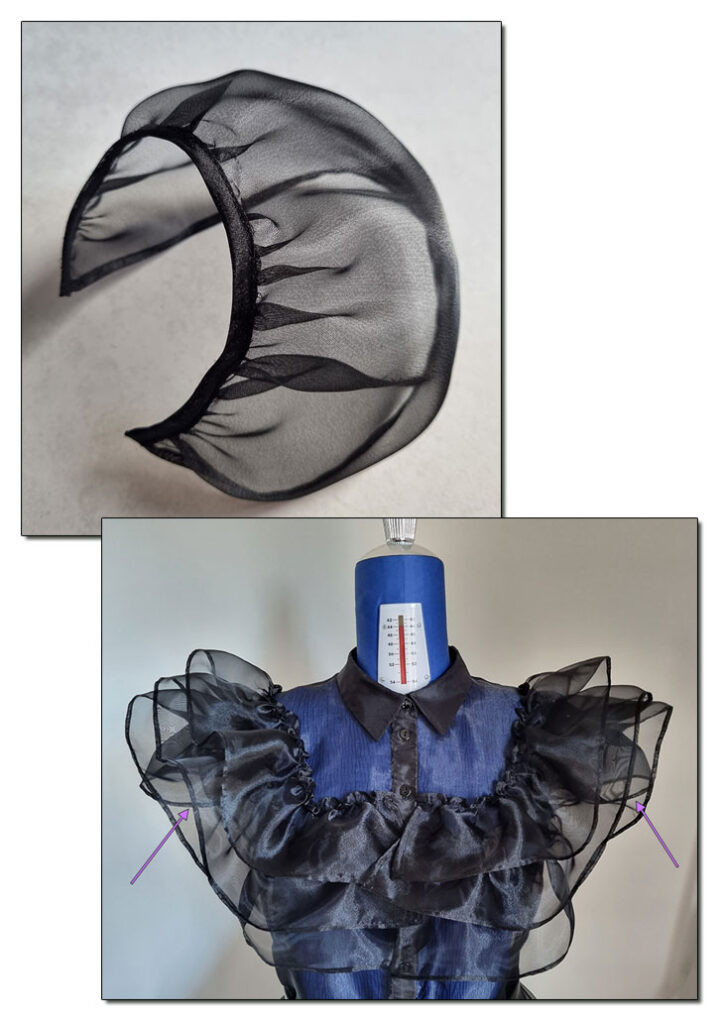 Close-up detail of the extra detachable organza ruffles added to the armholes of the Wednesday dress.
Now, let’s share some highlights from our photoshoot in Milan! I’ll likely be posting more on social media soon…
This is Jessica, our wonderful model. Makeup and hair were expertly styled by Simona Fantò. The elegant jewelry is from the local atelier Madina Visconti.
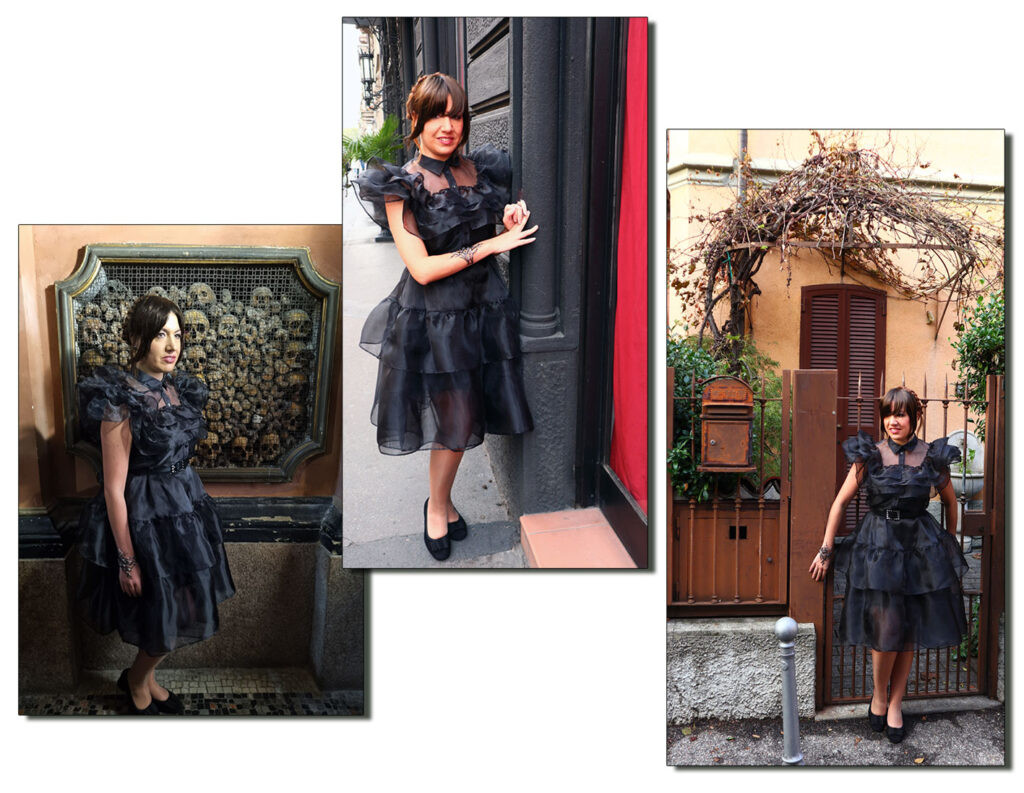 Jessica modeling the Wednesday prom dress in a stylish outdoor setting in Milan.
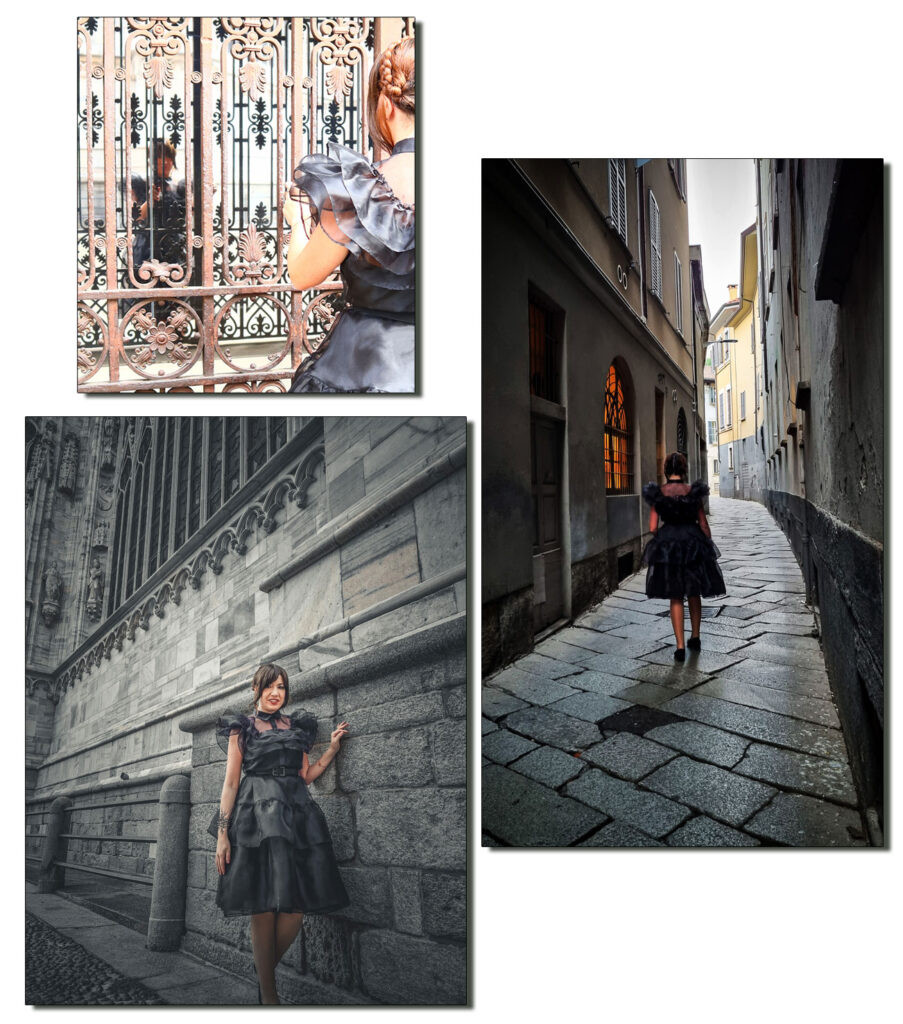 Jessica showcasing the DIY Wednesday Rave dress, highlighting the dress's movement and style.
I’m thrilled with how this dress turned out. While it’s not an exact replica of the original Alaïa dress, it captures the essence of the style beautifully. And, most importantly, it looks absolutely stunning on Jessica!