Planning an outdoor wedding and dreaming of a dance floor under the stars? Building your own dance floor can be a fun, cost-effective alternative to renting, and at ten-dance.com, we’re here to guide you through every step. This guide will help you create a stunning dance space that perfectly complements your special day, incorporating keywords like DIY dance floor, outdoor dance space, and wedding reception flooring. Let’s get started so you can build a dance floor and invite everyone to dance.
1. What Are the Benefits of Building a Dance Floor for an Outdoor Wedding?
Building your own dance floor offers significant advantages over renting, including cost savings, customization options, and a sense of personal accomplishment. Renting a dance floor can cost between $700 and $800, making it a substantial expense. Constructing one yourself can dramatically reduce these costs, potentially saving you hundreds of dollars. Building a dance floor allows you to tailor the size, shape, and design to perfectly match your wedding theme and venue layout. You can choose materials, colors, and finishes that reflect your personal style. Knowing that you and your loved ones created the dance floor adds a special, sentimental touch to your wedding day, making it even more memorable.
1.1. Cost-Effectiveness
Building a dance floor is generally cheaper than renting one. Materials like plywood and lumber are relatively inexpensive.
1.2. Customization
You can customize the size, shape, and design to perfectly fit your venue and wedding theme.
1.3. Personal Touch
Creating something yourself adds a unique and memorable element to your wedding.
2. What Are the Essential Considerations Before Building Your Dance Floor?
Before you start building, consider the location, size, and style of your dance floor to ensure it meets your needs and complements your wedding. Assess the ground where you plan to set up the dance floor. It should be as level as possible to prevent uneven surfaces that could be dangerous. Measure the available space and determine the ideal size for your dance floor. Consider the number of guests and the amount of space needed for comfortable dancing. Select a design that complements your wedding theme. Whether you prefer a classic wooden look, a checkerboard pattern, or a painted design, ensure it aligns with your overall aesthetic.
2.1. Location Assessment
The ground should be as level as possible. If it’s uneven, you may need to level it with sand or shims.
2.2. Size Determination
Consider the number of guests and the available space. A general rule is to allocate about 4 square feet per dancer.
2.3. Style and Design
Choose a design that complements your wedding theme. Options include classic wood, checkerboard patterns, or custom painted designs.
3. What Materials and Tools Will You Need to Build a Dance Floor?
Gathering the right materials and tools is crucial for a successful DIY dance floor project. You’ll typically need plywood sheets for the surface, lumber for the frame, fasteners to hold everything together, and finishing materials to protect and decorate the floor. Plywood is a stable and relatively inexpensive option for the dance floor surface. Choose a thickness of at least ½ inch for durability. Lumber such as 2x4s or 2x3s will be used to build the frame that supports the plywood. Nails, screws, and construction adhesive will securely join the frame and plywood. Select a paint, stain, or sealant to protect the wood and enhance its appearance. Include tools like a saw, drill, hammer, measuring tape, level, and safety glasses.
3.1. Plywood Sheets
Use ½ inch or thicker plywood for a sturdy surface.
3.2. Lumber for Framing
2x4s or 2x3s work well for creating a supportive frame.
3.3. Fasteners
Nails, screws, and construction adhesive will hold the frame and plywood together.
3.4. Finishing Materials
Paint, stain, or sealant to protect and decorate the floor.
3.5. Essential Tools
Include a saw, drill, hammer, measuring tape, level, and safety glasses.
4. How to Construct the Frame of the Dance Floor?
Building a solid frame is the foundation of your dance floor. Accurate measurements, secure joints, and proper support will ensure stability and prevent accidents. Start by cutting the lumber to the required lengths, according to your planned dimensions. Assemble the outer frame by joining the lumber pieces at right angles. Use screws and construction adhesive for a strong, durable connection. Add support beams within the frame to prevent sagging. Space them evenly to distribute weight effectively. Ensure the frame is level by using a level tool. Adjust as needed by adding shims under the frame to compensate for uneven ground.
4.1. Cutting the Lumber
Cut the lumber to the required lengths for your desired dimensions.
4.2. Assembling the Frame
Join the lumber pieces at right angles using screws and construction adhesive.
4.3. Adding Support Beams
Include support beams within the frame to prevent sagging. Space them evenly for optimal support.
4.4. Ensuring the Frame is Level
Use a level to ensure the frame is perfectly level. Adjust with shims if necessary to compensate for uneven ground.
5. How to Attach the Plywood Surface to the Frame?
Securing the plywood to the frame requires careful alignment and proper fastening techniques to create a smooth, safe dancing surface. Place the plywood sheets on top of the frame, aligning them carefully with the edges. Use nails or screws to attach the plywood to the frame. Space the fasteners evenly, paying close attention to the edges and support beams. Countersink the nails or screws to ensure they are flush with the surface of the plywood, preventing any tripping hazards. Inspect the surface for any rough spots or splinters. Sand them down to create a smooth, safe surface for dancing.
5.1. Aligning the Plywood
Place the plywood sheets on top of the frame, ensuring they align perfectly with the edges.
5.2. Fastening the Plywood
Use nails or screws to attach the plywood to the frame. Space them evenly, focusing on the edges and support beams.
5.3. Countersinking Fasteners
Countersink the nails or screws to ensure they are flush with the surface, preventing tripping hazards.
5.4. Sanding the Surface
Sand the surface to remove any rough spots or splinters, creating a smooth, safe surface for dancing.
 Building a Dance Floor Frame
Building a dance floor frame involves precision, ensuring square corners and a level surface for safe and enjoyable dancing.
6. What Are the Best Finishing Techniques for a Dance Floor?
Finishing your dance floor not only enhances its appearance but also protects it from wear and tear. Choose a finish that complements your wedding style and provides a durable, slip-resistant surface. Start by priming the plywood to create a smooth base for the paint or stain. This will also help to seal the wood. Apply paint or stain in your chosen color and design. Consider a checkerboard pattern, a solid color, or a custom design that matches your wedding theme. Seal the surface with a polyurethane coating to protect it from scratches and moisture. This will also make it easier to clean. Consider adding a non-slip coating to the surface to improve traction and prevent accidents, ensuring a safe dancing environment.
6.1. Priming the Surface
Apply a primer to the plywood to create a smooth base for the paint or stain.
6.2. Painting or Staining
Choose a paint or stain in your desired color and design. Consider a checkerboard pattern or a custom design that matches your wedding theme.
6.3. Sealing the Surface
Seal the surface with a polyurethane coating to protect it from scratches and moisture.
6.4. Adding Non-Slip Coating
Consider adding a non-slip coating to improve traction and prevent accidents.
7. How Can You Decorate Your Outdoor Wedding Dance Floor?
Decorating your dance floor can transform it into a focal point of your wedding, enhancing the ambiance and creating a memorable space for your guests. String lights around the perimeter of the dance floor to create a warm, inviting glow. Use fairy lights for a romantic touch or bistro lights for a rustic feel. Place floral arrangements around the dance floor to add color and elegance. Choose flowers that complement your wedding theme. Hang fabric drapes or ribbons from above to create a visually stunning canopy. Choose lightweight fabrics that flow gracefully in the breeze. Incorporate personalized elements such as monograms, custom signs, or themed decorations that reflect your unique style and make the dance floor truly your own.
7.1. String Lights
Hang string lights around the perimeter to create a warm, inviting atmosphere.
7.2. Floral Arrangements
Place floral arrangements around the dance floor to add color and elegance.
7.3. Fabric Drapes
Hang fabric drapes or ribbons from above to create a visually stunning canopy.
7.4. Personalized Elements
Incorporate personalized elements such as monograms or custom signs to make the dance floor unique.
8. How to Ensure Safety on Your Outdoor Wedding Dance Floor?
Safety is paramount when setting up a dance floor for your wedding. Secure construction, adequate lighting, and clear boundaries will help prevent accidents and ensure everyone can enjoy the celebration. Ensure the dance floor is stable and level to prevent trips and falls. Check for any loose boards or uneven surfaces. Provide adequate lighting around the dance floor to help guests see clearly. String lights, lanterns, or spotlights can enhance visibility. Clearly mark the boundaries of the dance floor to prevent guests from wandering off the edge. Use rope, ribbon, or decorative barriers. Have a first-aid kit readily available in case of minor injuries. Include bandages, antiseptic wipes, and pain relievers.
8.1. Stable and Level Surface
Ensure the dance floor is stable and level to prevent trips and falls.
8.2. Adequate Lighting
Provide sufficient lighting around the dance floor to help guests see clearly.
8.3. Clear Boundaries
Clearly mark the boundaries of the dance floor to prevent guests from wandering off the edge.
8.4. First-Aid Kit
Have a first-aid kit readily available in case of minor injuries.
9. What Are the Different Types of Dance Floors You Can Build?
Depending on your budget, skills, and wedding theme, you can choose from several types of DIY dance floors. Each offers a unique aesthetic and level of complexity. A simple plywood dance floor is the easiest and most cost-effective option. It involves attaching plywood sheets to a basic wooden frame. A checkerboard dance floor adds a classic, elegant touch. It involves painting alternating squares on the plywood surface. A pallet dance floor is a rustic, eco-friendly option. It involves disassembling and reassembling wooden pallets to create a unique surface. A portable dance floor is designed for easy assembly and disassembly, making it ideal for venues that require temporary setups.
9.1. Simple Plywood Dance Floor
The easiest and most cost-effective option, involving plywood sheets attached to a basic wooden frame.
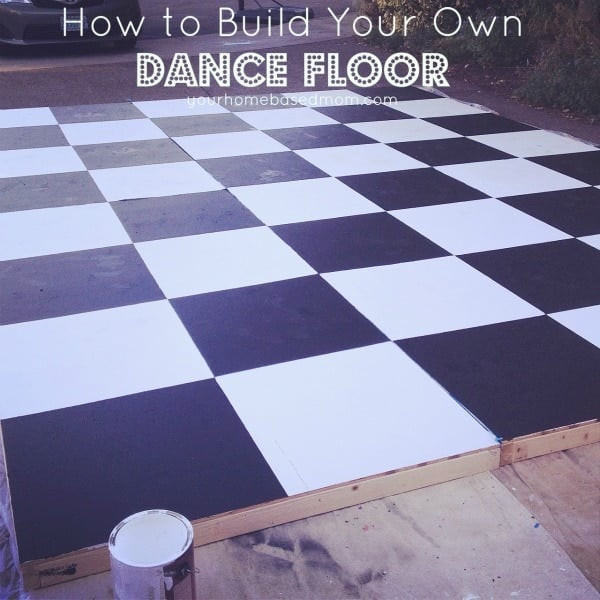
9.2. Checkerboard Dance Floor
Adds a classic, elegant touch by painting alternating squares on the plywood surface.
9.3. Pallet Dance Floor
A rustic, eco-friendly option using disassembled and reassembled wooden pallets.
9.4. Portable Dance Floor
Designed for easy assembly and disassembly, ideal for venues that require temporary setups.
10. How to Maintain Your Dance Floor After the Wedding?
Proper maintenance will extend the life of your dance floor, allowing you to use it for future events or even repurpose the materials. Clean the dance floor thoroughly after the wedding to remove any dirt, spills, or debris. Use a mild detergent and a soft cloth. Store the dance floor in a dry, secure place to protect it from moisture and damage. Cover it with a tarp or plastic sheeting. Inspect the dance floor regularly for any signs of damage, such as loose boards, cracks, or splinters. Repair them promptly to prevent further deterioration. Consider repurposing the materials to create furniture, garden features, or other DIY projects, giving them a new life after the wedding.
10.1. Cleaning After the Wedding
Clean the dance floor thoroughly after the wedding to remove any dirt, spills, or debris.
10.2. Proper Storage
Store the dance floor in a dry, secure place to protect it from moisture and damage.
10.3. Regular Inspections
Inspect the dance floor regularly for any signs of damage and repair them promptly.
10.4. Repurposing Materials
Consider repurposing the materials to create furniture or other DIY projects.
Crafting a dance floor for your outdoor wedding is achievable with the right preparation and guidance. It’s a DIY project that adds a personal touch to your special day, perfectly aligning with your wedding’s aesthetic. Building your own dance floor offers cost savings, customization options, and the satisfaction of a unique creation.
For those in search of dance inspiration or classes, explore ten-dance.com. Discover a world of resources to enhance your dance floor experience.
FAQ: Frequently Asked Questions About Building an Outdoor Wedding Dance Floor
1. What is the best material for an outdoor dance floor?
Plywood is a good choice because it’s affordable, durable, and provides a smooth surface. Make sure to seal it properly to protect it from moisture.
2. How much does it cost to build a dance floor for a wedding?
The cost varies depending on the size and materials used, but you can typically build one for $300 to $500, which is less expensive than renting.
3. How do I make sure the dance floor is level on uneven ground?
Use shims or level sand to create a level base before building the frame. A level tool is essential for this.
4. What size dance floor do I need for my wedding?
A general rule is to allocate about 4 square feet per dancer. Estimate how many people will be dancing at once to determine the appropriate size.
5. Can I build a dance floor on grass?
Yes, but you’ll need to ensure the ground is as level as possible and use a moisture barrier to protect the wood from dampness.
6. How do I prevent the dance floor from being slippery?
Apply a non-slip coating or use a textured paint to improve traction. You can also add a layer of non-slip mats underneath.
7. What tools do I need to build a dance floor?
Essential tools include a saw, drill, hammer, measuring tape, level, safety glasses, and sandpaper.
8. How long does it take to build a dance floor?
Depending on the size and complexity, it can take anywhere from one to three days to build a dance floor.
9. How do I store the dance floor after the wedding?
Clean it thoroughly, disassemble it if possible, and store the pieces in a dry, secure place. Cover with a tarp to protect from moisture and dust.
10. Can I customize the dance floor with a specific design?
Absolutely Customize the dance floor with paint, stencils, or even lighting.
Address: 60 Lincoln Center Plaza, New York, NY 10023, United States.
Phone: +1 (212) 769-7000.
Website: ten-dance.com.